
Are you searching for a creative way to add charm and personality to your garden? A DIY fairy door might be exactly what you need. This delightful garden craft project has taken the world of outdoor decorating by storm, captivating the imaginations of children and adults alike. Whether you’re a seasoned gardener or a complete beginner, creating a fairy garden door is one of the easiest and most rewarding projects you can tackle this weekend.
In this complete guide, we’ll walk you through everything you need to know about making a fairy door for your garden — from choosing the right materials and finding the perfect spot, to adding those magical finishing touches that bring the whole scene to life. Best of all, this project costs under $15 and takes only 20 minutes from start to finish.
Let’s dive in and create a little magic.
What Is a Fairy Door and Why Are They So Popular?
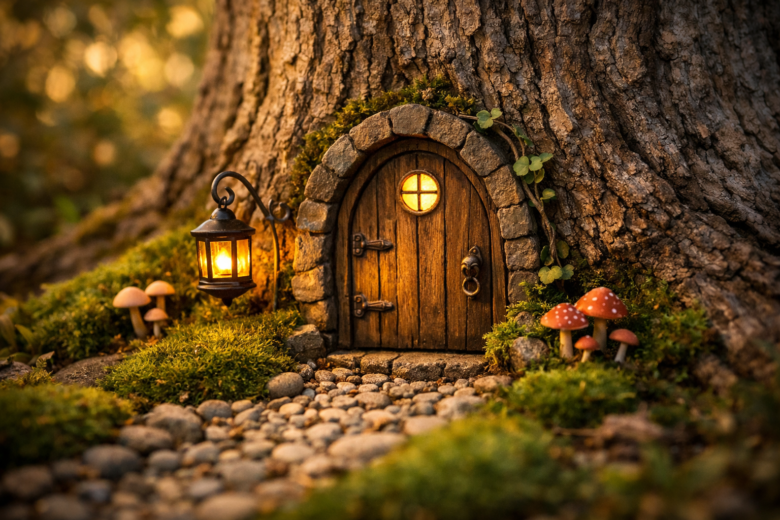
A fairy door is a miniature decorative door, typically attached to the base of a tree, wall, or garden fence. The idea is simple but wonderfully imaginative — the door acts as a tiny portal for fairies and other magical creatures to enter and exit your garden.
Fairy doors have surged in popularity in recent years, and it’s easy to see why:
- They spark creativity and imaginative play in children
- They add a unique, whimsical touch to any garden or outdoor space
- They are incredibly affordable and easy to make
- They work beautifully in all garden styles, from cottage gardens to modern landscapes
- They make wonderful gifts for garden lovers of all ages
Whether you’re creating one for your kids, your grandchildren, or simply for yourself, a fairy door is a small addition that makes a surprisingly big impact.
What You’ll Need: Fairy Door Materials and Supplies
One of the best things about this DIY fairy garden door project is that the materials are minimal, inexpensive, and easy to find. Here’s your complete shopping list:
Essential Supplies
- A fairy door (wooden doors with tiny hinges are especially charming)
- Outdoor weatherproof adhesive (strong and waterproof)
- A tiny welcome mat
- A mini LED lantern
Decorative Accessories
- Pebbles or small stones (you can find these right in your garden)
- Moss (natural or artificial both work well)
- Optional extras: miniature mushrooms, fairy figurines, tiny flower pots, or small signs
Tools You’ll Need
- A soft brush or cloth (for cleaning the tree surface)
- A level app on your smartphone
- A cloth or gloves for handling adhesive
Total estimated cost: Under $15
Most fairy doors can be found at craft stores, garden centers, or online marketplaces. If you’re feeling extra creative, you can even make your own fairy door from popsicle sticks, small pieces of wood, or air-dry clay.
1: Choose the Perfect Tree and Spot
The foundation of a great fairy door installation is choosing the right location. This step is more important than most people realize — the right tree can completely transform the look and feel of your fairy scene.
What to Look For in a Tree
The best trees for fairy doors have character and texture. Rough, interesting bark creates a natural backdrop that makes the fairy door look like it belongs there. Look for:
- Textured or gnarled bark that adds visual interest
- Interesting root formations at the base of the tree
- A trunk that is stable and healthy
- A spot that is visible but feels slightly hidden — as if you’ve stumbled upon a secret
Positioning the Door Correctly
Once you’ve chosen your tree, finding the right placement on the trunk is key:
- Position the door 6 to 12 inches from the ground — low enough to feel like a fairy-sized entrance, but high enough to stay clear of standing water
- Look for a flat, relatively smooth section of bark where the door will sit evenly
- Avoid areas with loose or flaking bark, as the adhesive won’t bond properly to unstable surfaces
Preparing the Surface
Before attaching anything, take a moment to prepare the tree surface:
- Use a soft brush or dry cloth to gently remove any debris, dirt, moss, or loose bark from the area
- Make sure the surface is completely dry before applying adhesive
- If needed, lightly press on the bark to ensure it is firmly attached to the tree
A clean, dry surface is the key to a long-lasting bond.
2: Attach the Fairy Door
Now comes the exciting part — attaching your fairy door to the tree. This step is simple, but a few key techniques will ensure your door stays secure through all weather conditions.
Choosing the Right Adhesive
Not all adhesives are created equal. For an outdoor project like this, you need an adhesive that is:
- Waterproof and weatherproof — it needs to withstand rain, frost, and heat
- Strong enough to hold the weight of the door over time
- Safe for use on natural surfaces like tree bark
Look for a construction-grade outdoor adhesive or a strong gorilla glue-style product at your local hardware store.
How to Attach the Door
Follow these simple steps for a secure attachment:
- Apply a generous amount of adhesive to the back of the fairy door, covering the edges thoroughly
- Press the door firmly against the prepared spot on the tree
- Hold it in place for 30 seconds while the adhesive begins to bond
- Use a level app on your smartphone to check that the door is perfectly straight — a crooked fairy door breaks the illusion!
- Allow the adhesive to fully cure according to the product instructions before adding accessories around it
Pro tip: If your fairy door has a flat back but the tree surface is slightly curved, apply a thicker layer of adhesive to compensate and create a flush fit.
3: Create a Magical Fairy Scene
Here’s where your creativity truly gets to shine. Once the door is secure, it’s time to build a magical miniature world around it. This is the step that transforms a simple decoration into a truly enchanting garden feature.
Add a Tiny Welcome Mat
Place a miniature welcome mat directly in front of the fairy door. This small detail adds an enormous amount of charm, suggesting that the fairy who lives inside is welcoming visitors. You can find tiny welcome mats at craft stores or online, or make your own from a small piece of burlap or cork.
Light the Way with a Mini LED Lantern
Position a mini LED lantern beside or above the fairy door. The soft, warm glow of the lantern creates a truly magical atmosphere, particularly in the evenings. Solar-powered lanterns are a great eco-friendly option, as they charge during the day and automatically glow at night — no batteries required.
Build a Pebble Pathway
Arrange small pebbles or stones in a curved line leading up to the fairy door to create a miniature pathway. This charming detail makes it look as though fairies are regularly coming and going. You can:
- Use smooth river pebbles for a polished look
- Mix different sizes and colors of stones for a more natural appearance
- Outline the pathway with tiny sticks or twigs for added definition
Add Moss for a Lush, Natural Feel
Moss is one of the most magical materials you can add to a fairy scene. Sprinkle or press patches of moss around the base of the door, along the pathway, and between the pebbles. It adds a lush, living quality to the scene that makes everything look as though it has grown there naturally over time.
Natural moss gathered from your garden works wonderfully, or you can purchase preserved decorative moss from a craft store.
Optional Finishing Touches
Take your fairy garden to the next level with a few extra accessories:
- Miniature mushrooms (red and white spotted toadstools are especially whimsical)
- Tiny fairy figurines peeking out from behind roots or moss
- Small decorative signs reading “Fairy Garden” or “No Humans Allowed”
- Miniature flower pots with tiny blooms
- A small mirror positioned to look like a fairy pond
The more detail you add, the more immersive and magical the final scene becomes.
Caring for Your Fairy Door Garden Feature
To keep your fairy door looking its best throughout the year, a little seasonal maintenance goes a long way:
- Check the adhesive bond after harsh weather and reapply if necessary
- Replace natural moss if it dries out or discolors
- Refresh pebble pathways that may shift over time
- Swap out accessories seasonally — add tiny pumpkins in autumn, miniature snowflakes in winter, or spring flowers to keep the scene fresh and exciting
- Repaint or seal wooden doors annually to protect against moisture and UV damage
Why Your Kids Will Absolutely Love This Project
Beyond its visual appeal, a fairy door is a powerful tool for encouraging imaginative play in children. Kids love the idea that magical creatures might live in their garden, and a fairy door gives that belief a physical anchor.
You can extend the magic by:
- Leaving tiny notes from the fairy for your children to discover
- Creating a fairy door journal where kids write letters to their garden fairy
- Building on the scene over time, adding new accessories as rewards or surprises
- Turning it into an ongoing storytelling adventure that grows with your child’s imagination
It’s one of those rare projects that is just as rewarding for parents as it is for kids.
Create Your Own Garden Magic Today
A fairy door is proof that the most magical things in life are often the simplest. For less than $15 and in just 20 minutes of your time, you can create a garden feature that sparks joy, wonder, and imagination every single day.
Whether you’re gifting it to a child, surprising a fellow garden lover, or simply treating yourself to a little everyday magic, a DIY fairy garden door is a project that delivers far more than its modest price tag suggests.
Ready to Create Your Own Fairy Door?
Start your fairy door project this weekend! Head to your local craft store or garden center, pick up your supplies, and follow this step-by-step guide to create your very own magical garden portal.
We’d love to see what you create — share your fairy door photos in the comments below and inspire other garden lovers to add a little magic to their outdoor spaces. Don’t forget to subscribe to Home and Garden Lab for more fun, affordable, and creative garden projects delivered straight to you every week.