You have old tires sitting in your garage or yard. You also have toy cars scattered all over your kid’s room. And you want to add something fun and creative to your space without spending a lot of money.
Sound familiar?
The truth is, most people either throw away old tires or leave them taking up space. They don’t realize that an old tire can become something amazing. And your child’s toy cars deserve a home that looks cool.
This is where turning an old tire into a toy car display shelf comes in.
In this guide, you’ll learn exactly how to transform a tire into a practical and stylish display shelf. You’ll get step by step instructions. You’ll see design ideas that look great. And you’ll discover mistakes to avoid so your project turns out perfect.
Watch the full step-by-step video here
Why You Should Build a Toy Car Display Shelf From an Old Tire
Let’s be honest. Buying a new shelf from a store costs money. It takes time to assemble. And it might not match your style.
When you turned an old tire into a toy car display shelf, you get:
• A unique piece that nobody else has
• Zero to low cost because you’re using something you already have
• A fun project that you and your kids can do together
• A way to organize toys in a way that looks intentional and cool
• An eco friendly solution that keeps waste out of landfills
Your kids will also feel proud. They helped create something. They see their favorite toys displayed nicely. And their room looks more organized and fun.
What You’ll Learn in This Guide
Before you start, here’s what we’re covering:
• How to pick the right tire for your project
• What materials and tools you actually need
• Three design ideas you can use right now
• Step by step building instructions
• Mistakes people make and how to avoid them
• Tips to make your shelf last for years
Let’s get started.
Materials You Need to Build Your Toy Car Display Shelf
You probably have most of these items at home already.
Essential Materials:
• One old car tire (clean and dry)
• Wood boards or plywood (for shelves inside the tire)
• Paint or wood stain (to match your decor)
• Sandpaper (to smooth rough edges)
• Wood glue or strong adhesive
• Screws or nails (optional, for extra support)
Tools You’ll Need:
• Saw (to cut wood pieces)
• Paintbrush or roller
• Measuring tape
• Pencil or marker
• Safety glasses
• Work gloves
Where to Get an Old Tire:
You can find old tires at tire shops for free or cheap. Ask your neighbors. Check local classifieds. Or look in your own garage. Many tire shops will give you one if you ask nicely. According to Family Handyman, choosing the right wood glue and adhesive ensures your shelves stay securely attached for years.
How to Prepare Your Tire Properly
Before you start building, preparation is key.
1: Clean Your Tire
Wash the tire with soap and water. Scrub the inside and outside. Let it dry completely. Dirty tires won’t look good and paint won’t stick well.
2: Check for Damage
Look for cracks, bulges, or rotten spots. A minor crack is fine. But avoid tires that are falling apart.
3: Sand the Surface
Use sandpaper to rough up the surface where you’ll paint. This helps paint stick better. Work in circular motions. Don’t go crazy. Just light sanding is enough.
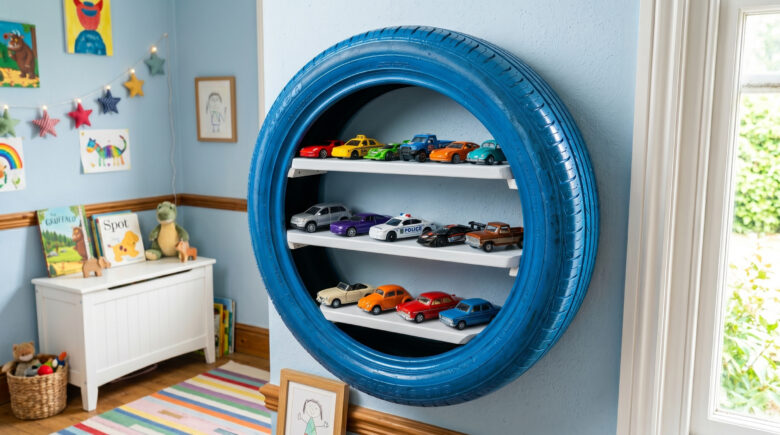
3 Easy Design Ideas for Your Toy Car Display Shelf
Your toy car display shelf doesn’t have to look complicated. Here are three designs you can copy right now.
1: The Classic Look
This is the simplest option. Paint your tire a solid color. White, black, or navy blue look clean and modern. Add one wooden shelf inside running horizontally. Arrange your toy cars on the shelf. This style works in any room.
2: The Colorful Rainbow
Paint your tire in a bright color like red, yellow, or teal. Add multiple wooden shelves at different heights. This creates more space for more cars. Kids love the bright, fun vibe. It makes their room feel playful and creative. Better Homes & Gardens offers color schemes and design ideas that work perfectly for children’s bedrooms if you want more inspiration.
3: The Rustic Wood Finish
Skip the paint and stain the wood shelves instead. Leave the tire black or paint it charcoal gray. Add natural wood shelves that show the grain. This gives you a rustic, grown up look. Parents love this style because it fits modern home decor.
How to Build Your Toy Car Display Shelf Step by Step
Now for the part you came for. Here’s exactly how to build it.
1: Measure and Cut Your Wood
Measure the inside diameter of your tire. Subtract one inch on each side so your shelf fits snugly. Cut your wood boards to this length. You can use one shelf or three. It’s up to you.
2: Sand Your Wood Pieces
Smooth all edges with sandpaper. This prevents splinters and looks more professional. It takes five minutes but makes a big difference. The Spruce recommends proper sanding techniques and safety equipment for woodworking projects.”
3: Paint Your Tire
If you’re painting, use outdoor paint. Apply two coats. Let each coat dry completely between applications. Paint the inside and outside. This takes a few hours but protects your tire and looks better.
4: Paint or Stain Your Wood
If you’re painting, use the same color as your tire or a contrasting color. If you’re staining, follow the product instructions. Again, use two coats. Let it dry fully before moving on.
5: Attach Your Shelves
This is where people get nervous. Don’t worry. It’s easy.
You have two options:
A: Adhesive Method (Easiest)
Apply wood glue to the bottom of your wooden shelf. Press it firmly into the tire. Hold it for 60 seconds. Let it dry for 24 hours before putting anything on it. This works great and looks clean.
B: Screw Method (More Sturdy)
Drill pilot holes through the tire into the wood. Use wood screws to attach the shelf. This is stronger and better if you expect weight.
6: Add Your Toy Cars
Arrange your toy cars on the shelves. You can organize by color, size, or type. Make it look intentional. Step back and admire your work.
5 Mistakes to Avoid When Building Your Toy Car Display Shelf
I’ve seen people make these mistakes. Don’t be one of them.
1: Using a Wet or Dirty Tire
Paint won’t stick to dirty surfaces. Your whole project will peel off. Always clean and dry your tire first.
2: Skipping the Sanding
Sanded surfaces hold paint better. Skipping this step leads to peeling paint and a shabby look. Take the five minutes to sand.
3: Using Interior Paint
Interior paint isn’t made for tires. Use exterior or outdoor paint. It lasts longer and handles temperature changes better.
4: Rushing the Drying Time
I know you’re excited. But don’t put weight on your shelf until the glue is fully dry. Wait the full 24 hours. Your shelf will be stronger.
5: Overloading with Cars
Don’t pack every toy car you own onto one shelf. It looks cluttered and puts too much weight on the wood. Choose your favorite cars and display them. Rotate the others.
How to Make Your Toy Car Display Shelf Last Longer
You want this project to last years, not months.
Protect From Weather
Keep your shelf indoors or under a covered area. Sun and rain fade paint and rot wood. A bedroom, playroom, or covered porch is ideal.
Use Quality Materials
Cheap wood and paint don’t last. Invest a little more in outdoor rated materials. Your shelf will look better and survive longer.
Check It Quarterly
Every three months, look for peeling paint, loose wood, or damage. Touch up paint if needed. Tighten any loose screws.
Avoid Heavy Cars
Toy cars are light. But don’t add other heavy items to your shelf. Keep it designed for toy cars only.
Common Questions About Toy Car Display Shelves
Q: Can I hang my tire shelf on the wall?
A: Yes. Use heavy duty wall anchors or bolts. Make sure your wall can handle the weight.
Q: How many cars can one shelf hold?
A: Usually 5 to 8 cars, depending on the shelf size. More than that looks crowded.
Q: Can I use different colored paint for each shelf?
A: Absolutely. This creates a fun, colorful look that kids love. Just make sure the colors coordinate.
Final Call to Action
You now have everything you need to build an amazing toy car display shelf.
Don’t let that old tire sit in your garage anymore. Transform it into something your kids will love. This project takes a weekend. It costs almost nothing. And you’ll feel proud every time you see it.
Here’s what to do next:
- Find an old tire (ask at a tire shop)
- Gather your materials this weekend
- Follow the steps above
- Watch the complete 60-second tutorial here
- Share a photo of your finished shelf in the comments below
I want to see what you create. Comment below and tell me which design idea you’re going to try. Share this with a friend who loves DIY projects. And if you build your shelf, send me a picture. I’d love to feature it.
Your kids are waiting. Let’s turn that old tire into treasure.