You stare at your balcony or garden. It looks flat. Empty. Boring.
You want to add personality. You want your space to feel like yours. But buying expensive garden decorations costs too much money.
Here’s the good news. You can create beautiful garden art yourself. And it’s easier than you think.
A cement caterpillar is the perfect DIY project. It takes just a few hours. It costs very little. Anyone can make one, even if you’ve never done a craft project before.
In this guide, yostep-by-stepxactly how to build your own cement caterpillar. You’ll discover what materials you need. You’ll get clear step by step instructions and you’ll also learn design ideas that make your caterpillar unique.
Let’s get started.
Watch the Full Step by Step Video Here
This video shows you exactly how I make a cement caterpillar from start to finish. Seeing it in action makes the whole process easier to understand.
What Is a Cement Caterpillar and Why Make One?
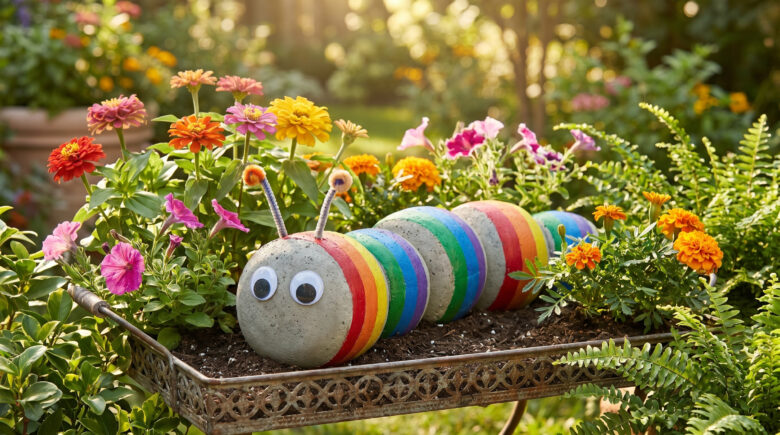
A cement caterpillar is a garden decoration made from concrete and simple household items. It’s a series of round cement balls stacked together. They form a caterpillar shape.
You paint it bright colors. Add eyes. Maybe add antennae. Suddenly you have a cute garden friend that makes people smile.
Why make one?
You save money. Store bought garden decorations cost $30 to $100 each. Your cement caterpillar costs under $10.
You create something personal. Your caterpillar reflects your style. Your colors and your creativity.
You have fun doing it. This project is relaxing. It’s enjoyable. You’ll feel proud when people ask where you bought it.
You get a garden that feels alive. A concrete caterpillar adds character. It makes your outdoor space special.
Materials You’ll Need for Your Cement Caterpillar DIY
Before you start, gather everything. This prevents you from stopping midway through.
Essential Materials:
- Cement mix (quick set works best)
- One pair of nylon stockings
- String or rubber bands
- Water
- Large bucket or container
- Spray paint (green, or your chosen base color)
- Acrylic paint (various colors for details)
- Paintbrush
- Newspaper or drop cloth
- Gloves and old clothes
Optional Materials:
- Googly eyes (for caterpillar face)
- Pipe cleaners (for antennae)
- Decorative tray or stand
- Sealer or polyurethane (to protect paint)
You can find cement mix at any hardware store. Look for brands like Quikrete. The same goes for spray paint and acrylic paints. Most people already have paintbrushes at home.
Nylon stockings are easy to find. Check your drawer. Ask a family member. A dollar store sells them cheaply.
For more details on selecting the right cement for outdoor projects, check out The Concrete Network’s guide to concrete types.
How to Build Your Cement Caterpillar DIY: Step by Step
This is where the magic happens. Follow these steps carefully.
1: Prepare Your Work Area
Cover your workspace with newspaper. Cement can stain.
Put on old clothes and gloves. You will get dirty. That’s normal.
Work outside or in a garage. Good air flow helps the cement dry properly.
2: Mix Your Cement
Follow the cement package instructions. Usually, you mix one part cement with water.
Mix it in a bucket. Stir until it looks like thick oatmeal. Not too watery. Not too thick.
The texture matters. Too watery and it won’t hold shape. Too thick and it won’t fill the stocking properly.
3: Fill Your Nylon Stocking
Take your nylon stocking. Tie off the bottom with string.
Scoop cement into the stocking carefully. Fill it with cement mixture.
Smooth it out with your hand as you go. You want round, even cement balls forming inside.
4: Create the Caterpillar Segments
Tie off the stocking with string after each ball you want. Tie it tight.
Make 5 to 8 balls depending on how long you want your caterpillar. Each ball should be roughly the same size.
The segments should look like beads on a string. That’s exactly what you’re creating.
5: Let It Dry Completely
Place your cement caterpillar in a safe spot. Let it dry for 24 to 48 hours.
Don’t rush this step. Wet cement is fragile. Dry cement is strong.
Check the package instructions for exact drying time.
6: Remove the Nylon Stocking
Once cement is hard, carefully cut and peel away the nylon stocking.
You now have a bumpy concrete caterpillar. It looks rough. That’s perfect.
This rough texture helps paint stick better.
7: Spray Paint the Base Color
Apply spray paint in a well ventilated area. Green is traditional for caterpillars. But use any color you like.
Apply two to three light coats. Let it dry between coats.
Don’t use one heavy coat. It drips. Multiple light coats look professional.
For spray painting techniques and safety tips, visit This Old House’s guide to spray painting.
8: Add Details with Acrylic Paint
Now comes the fun part. Paint eyes on the front segment.
Add stripes. Add dots and spots. Paint a mouth.
Let your imagination guide you. There are no wrong choices here.
Use a small paintbrush for fine details. Use a bigger brush for background colors.
9: Add Personality with Optional Decorations
Glue on googly eyes if you want. Use hot glue or craft glue.
Add pipe cleaners for antennae. Push them into the top cement ball.
Maybe add a decorative tray underneath. It frames your caterpillar nicely.
10: Seal Your Caterpillar (Optional)
Apply clear sealer or polyurethane over the paint. This protects it from rain and sun.
This step makes your cement caterpillar last longer outdoors. It’s optional but helpful.
3 Easy Design Ideas for Your Cement Caterpillar DIY
You don’t have to copy my design. Here are three simple ideas.
The Rainbow Caterpillar
Paint each segment a different color. Red, orange, yellow, green, blue, purple.
It looks fun. Kids love it. It brightens up any garden space.
The Striped Caterpillar
Paint your caterpillar one base color. Then add thick stripes around each segment.
Use contrasting colors. Dark green with yellow stripes works great. Or purple with white.
The Fuzzy Caterpillar
Keep it simple. One solid color. Add a cute face with big eyes and a smile.
You could add texture by gluing small pebbles or beads to the segments. This gives it character.
5 Common Mistakes to Avoid
Learn from others’ errors. Don’t repeat them.
1: Cement Mix Is Too Watery
This makes your caterpillar weak and lumpy. Mix cement thicker than you think you need.
2: Uneven Segments
Don’t tie off the stocking randomly. Make each ball roughly the same size for a professional look.
3: Removing the Stocking Too Early
Wet cement is soft. Wait the full drying time. Patience pays off.
4: Using Only One Paint Coat
One coat looks thin and streaky. Use at least two coats for solid color coverage.
5: Skipping the Sealer
If you plan to leave it outside, use sealer. Without it, rain washes away the paint faster.
How to Make Your Cement Caterpillar Last Longer
Your cement caterpillar can stay beautiful for years. Here’s how.
Place it in a sheltered spot. Under a roof edge or tree is ideal. Direct rain speeds up paint fading.
Use outdoor paint. Regular acrylic paint fades faster than exterior grade paint.
Apply a clear sealer. This is the single best way to protect outdoor art. Reapply every year or two.
Bring it inside during winter. If you live somewhere cold, move your caterpillar to a garage or shed. Freezing and thawing can crack concrete.
Clean it gently. Use a soft brush and water. Don’t use harsh chemicals.
For more information on protecting outdoor concrete projects, check out Bob Vila’s concrete sealing guide.
Design Ideas for Different Garden Styles
Your cement caterpillar can fit any garden theme.
Modern Garden. Use solid colors. Grays, blacks, and whites. Simple, clean lines.
Cottage Garden. Go bright and colorful. Pastels work well. Add lots of painted details.
Tropical Garden. Use vibrant colors. Oranges, purples, teals. Maybe add painted flowers or leaves.
Kid’s Garden. Make it silly. Goofy eyes. Bright colors. Fun personality. Kids will love showing their friends.
Frequently Asked Questions
How long does this project take?
Actual building takes 30 to 60 minutes. Drying takes 24 to 48 hours. Painting takes another hour.
Can I make it indoors?
Yes, but ventilation matters. Open windows. Cement dust can irritate lungs. Working outside is better.
What if my cement cracks?
Small cracks are normal. They add character. Large cracks mean your cement was too watery. Better luck next time.
Can I make it bigger?
Absolutely. Use more stocking. Make bigger segments. More cement costs a bit more. The process stays the same.
Will it last outside?
Yes. Concrete is very durable. Paint will fade over time. That’s why sealer helps.
Ready to Build Your Own Cement Caterpillar?
You now know everything needed to create a beautiful cement caterpillar DIY project.
Here’s what to do next:
- Gather your materials this week
- Watch the full step by step video here: [INSERT YOUR YOUTUBE LINK]
- Pick a design that excites you
- Start building this weekend
- Share your finished caterpillar in the comments below
I want to see what you create. Comment with photos of your cement caterpillar. Tell me what colors you chose. Let me know what you named it.
Did this guide help you? Share it with a friend who loves DIY projects. They’ll thank you for introducing them to this fun craft.
Your garden is about to get a lot more interesting. Your cement caterpillar will make people smile. It will make your outdoor space feel like home.
Start today. Your caterpillar is waiting to be created.