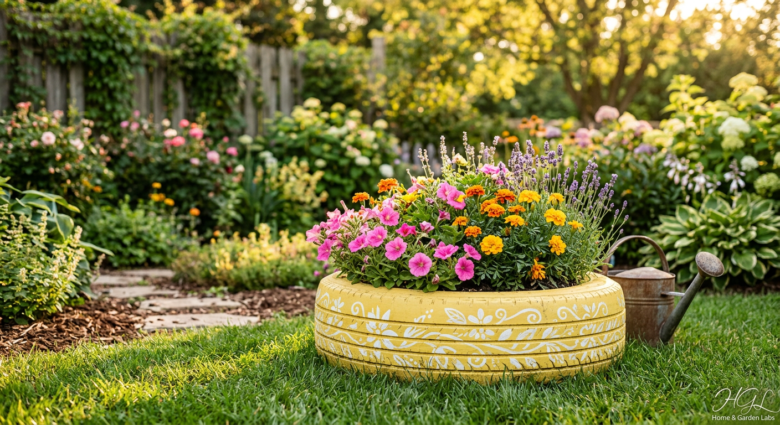
If you’ve been scrolling through garden inspiration boards lately, you’ve probably noticed one upcycling trend that keeps rolling back into the spotlight — old tire flower planters. What was once destined for a landfill is now becoming the centerpiece of backyard gardens everywhere, and honestly? We’re completely here for it.
Whether you have a single worn-out tire sitting in your garage or a stack of them collecting dust, this creative DIY project is your ticket to a vibrant, eco-friendly garden upgrade that costs almost nothing. In this complete guide, we’ll walk you through everything you need to know about transforming an old tire into a colorful flower planter — from preparation and painting to the best flowers to plant and pro tips for making your creation last for years.
Also Check our Detailed Guide on Youtube, Let’s dig in.
Why Tire Planters Are the Hottest Gardening Trend Right Now
Before we get our hands dirty, let’s talk about why tire planters have exploded in popularity among home gardeners, DIY enthusiasts, and eco-conscious decorators alike.
The Environmental Angle
Every year, hundreds of millions of tires are discarded worldwide, and they are notoriously difficult to dispose of responsibly. Tires don’t biodegrade easily, and improper disposal contributes significantly to environmental pollution. By repurposing old tires as garden planters, you’re actively diverting rubber waste from landfills and giving a discarded object a meaningful second life.
That’s not just good gardening — that’s good citizenship.
The Budget-Friendly Factor
Traditional garden planters, especially decorative ceramic or stone ones, can cost anywhere from $30 to well over $200. An old tire? Free (or nearly free, if you pick one up from a local garage or tire shop). Add a few dollars’ worth of paint and potting soil, and you’ve created something genuinely beautiful for under $20.
The Aesthetic Appeal
Done right, DIY tire planters are absolutely stunning. With the right paint colors, creative designs, and the perfect flower combinations, they can become focal points of any outdoor space — backyard patios, front yard landscapes, balconies, and community gardens alike.
What You’ll Need: Supplies for Your Tire Flower Planter
Before you start this project, gather everything on this list. Having your materials ready before you begin makes the whole process smoother and more enjoyable.
Essential Supplies:
- One or more old tires (check local garages, tire shops, or online marketplaces — many give them away for free)
- Wire brush or stiff bristle brush (for cleaning)
- Dish soap and water
- Sandpaper (medium grit)
- Spray paint or exterior-grade acrylic paint (in your chosen colors)
- Paintbrushes (various sizes)
- Clear sealant or weather-resistant topcoat
- Potting soil or garden soil mix
- Gravel or small stones (for drainage)
- Your chosen flowers and plants
- Gardening gloves
Optional but Helpful:
- Stencils for decorative patterns
- Landscape fabric (to line the tire base)
- A palette knife or sponge for textured painting effects
Step-by-Step Guide: How to Make a Tire Flower Planter
1: Clean Your Tire Thoroughly
Start by giving your old tire a thorough cleaning. Use a wire brush to remove any loose dirt, debris, or rust flakes from the rim (if it’s attached). Then scrub the entire surface with dish soap and warm water. Pay special attention to the grooves in the tread — dirt loves to hide there.
Rinse it completely and allow it to dry for at least 24 hours before moving to the next step. Painting over a damp surface is one of the most common mistakes beginners make, and it leads to peeling paint down the road.
2: Lightly Sand the Surface
Once dry, use medium-grit sandpaper to lightly rough up the outer surface of the tire. This step is crucial — it creates a better surface for paint adhesion and ensures your color stays vibrant through sun, rain, and everything else the outdoors throws at it.
You don’t need to sand aggressively; a light scuff is all it takes.
3: Plan Your Design
This is where the fun really begins! Before you pick up a brush, take a moment to plan your color scheme and design. Some popular options include:
- Solid bold colors (bright yellow, cherry red, cobalt blue)
- Ombre or gradient effects (sunset oranges blending into pinks)
- Geometric patterns using painter’s tape as guides
- Floral designs painted directly onto the tire surface
- Stenciled patterns like vines, butterflies, or polka dots
- Chalkboard paint finish for a writable, changeable surface
Think about your existing garden color palette and choose something that complements — or boldly contrasts — your outdoor space.
4: Apply Your Base Coat
Using exterior-grade spray paint or acrylic paint, apply your base coat evenly across the tire’s outer surface. If using spray paint, hold the can about 12 inches from the surface and use smooth, sweeping motions to avoid drips.
Allow the first coat to dry completely, then apply a second coat for full, vibrant coverage. Two coats is typically sufficient for most solid colors, though bright shades like yellow or white may need a third.
5: Add Decorative Details
Once your base coat is dry, it’s time to get creative. Use paintbrushes of various sizes to add patterns, designs, or details. Use stencils if you’re worried about freehand painting. There’s no wrong answer here — embrace your personal style and let your creativity run wild.
This is also a great step to involve kids or grandchildren, turning the project into a memorable family activity.
6: Seal and Protect Your Work
After your design is complete and fully dry, apply a clear weather-resistant sealant over the entire painted surface. This protective layer is non-negotiable if you want your tire planter to maintain its vibrant look through multiple seasons. Look for a UV-resistant, waterproof topcoat for best results.
Allow the sealant to cure fully — usually 24 to 48 hours — before moving to the planting stage.
7: Prepare for Planting
Position your tire in its final location before filling it with soil, because it gets heavy! If you’re placing it on a patio or hard surface, consider setting it on a tray to catch water drainage.
Add a layer of gravel or small stones to the bottom of the tire’s interior to promote proper drainage and prevent root rot. If desired, line the interior with landscape fabric to keep soil from washing out through the tire’s opening.
Then fill with a high-quality potting mix, leaving a few inches from the top for planting.
8: Plant Your Flowers!
Now for the most rewarding part — choosing and planting your flowers. The interior of a tire planter is surprisingly spacious and works well for a wide variety of plants.
Best Flowers to Plant in a Tire Planter
Choosing the right flowers makes all the difference between a planter that looks good for a week and one that thrives all season long. Here are some of the best flowers for tire planters, based on hardiness, visual impact, and ease of care:
Sun-Loving Showstoppers
- Marigolds – Bright, cheerful, pest-repelling, and nearly impossible to kill
- Petunias – Cascading, colorful, and available in an incredible range of colors
- Zinnias – Heat-tolerant, long-blooming, and beloved by butterflies
- Geraniums – Bold color, low maintenance, and great for hot climates
- Sunflowers – Dwarf varieties work beautifully in tire planters
Shade-Tolerant Options
- Impatiens – Perfect for shadier spots, with continuous blooms all season
- Begonias – Beautiful, long-lasting, and available in stunning color varieties
- Ferns – Add lush, tropical texture to shaded areas
Pollinator-Friendly Choices
- Lavender – Fragrant, drought-resistant, and adored by bees
- Coneflowers (Echinacea) – Native wildflowers that attract butterflies and birds
- Black-Eyed Susans – Hardy, bold, and wildlife-friendly
Edible Options (Yes, Really!)
- Herbs like basil, thyme, and mint thrive in tire containers
- Strawberries cascade beautifully over the edges of tire planters
- Cherry tomatoes do surprisingly well with enough sunlight
Pro Tips for Long-Lasting, Gorgeous Tire Planters
Want to take your tire planter game to the next level? Keep these expert tips in mind:
- Stack tires for a raised bed effect — two or three tires stacked create dramatic height and more planting depth
- Paint the inside white to reflect heat and keep roots cooler during summer months
- Rotate seasonal plantings — pansies in spring, petunias in summer, ornamental kale in fall
- Water consistently — tire planters can dry out quickly in hot weather, especially in full sun
- Group multiple planters of varying sizes for a layered, professional landscape look
- Elevate small planters on bricks or pavers for better drainage and visual interest
A Note on Safety
One question that often comes up is whether old tires are safe to use in gardens, particularly for edible plants. While tires can leach small amounts of zinc and other compounds over time, most research suggests the risk is minimal for ornamental gardens. For edible plantings, consider lining the interior of the tire with heavy-duty plastic or landscape fabric as an extra precaution, and opt for decorative plantings as the primary use.
Your Turn to Get Rolling!
Turning an old tire into a colorful flower planter is one of those rare DIY projects that checks every box — it’s budget-friendly, eco-conscious, creatively fulfilling, and genuinely beautiful when done with a little care and intention. Whether you go bold with neon paint and tropical blooms or keep it elegant with earthy tones and lavender, the result is something uniquely yours.
So here’s your challenge: Find one old tire this weekend — check your garage, ask a neighbor, or visit your local tire shop — and give it a new life. Share your creation on social media with the hashtag #TirePlanterGarden and inspire others to see the beauty in what others throw away.
Drop your questions, flower suggestions, or photos of your own tire planters in the comments below. We’d love to see what you create!