You want your home to look beautiful. But buying fancy decorations costs a lot of money. And most DIY projects seem too hard or take too long.
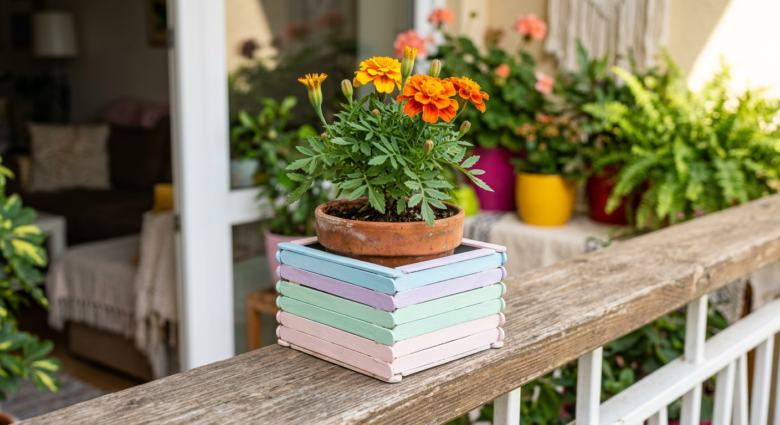
Here is the good news. You can make a stunning flower pot stand using ice cream sticks. It costs almost nothing. It takes very little time. And the result looks so good that people will ask where you bought it.
This article walks you through everything. You will learn what materials you need, how to build the stand step by step, how to paint it, and how to grow plants in it. By the end, you will be ready to start your own project today.
Want to see the full process in action before you read? Watch the full 60-second video here and see how simple ice cream sticks turn into a beautiful flower pot stand in just one minute.
Why Ice Cream Stick Crafts Are So Popular Right Now
Ice cream stick crafts have blown up on social media. And it is easy to see why.
First, the materials are cheap. You probably already have some at home. If not, a big pack costs very little at any craft store.
Second, the results look professional. People are genuinely surprised by how good these projects turn out.
Third, it is relaxing. Working with your hands and seeing something come to life feels satisfying in a way that scrolling your phone never does.
And fourth, it is eco-friendly. Reusing materials is always a good thing.
The ice cream stick flower pot stand fits all of these reasons perfectly. It is one of the most rewarding beginner crafts you can try.
What You Need Before You Start
Gathering your materials first saves time. Here is everything you need for this project.
Main Materials:
- Ice cream sticks (also called popsicle sticks or craft sticks)
- Strong craft glue or a hot glue gun
- Use acrylic paint in your favorite colors for the best results on wood surfaces.
- A small paintbrush
- Sandpaper (optional but helpful)
- A small plastic or clay pot
- Potting soil
- Seeds or a small plant
Optional Extras:
- Clear varnish to seal the paint
- Ribbon or twine for decoration
- Small decorative stones or beads
You can find craft sticks at dollar stores, hobby shops, or online. Buy more than you think you need. It is better to have extras than to run short in the middle of your project.
How to Build Your Ice Cream Stick Flower Pot Stand: Step by Step
This is the fun part. Follow these steps carefully and you will be amazed at what you can make.
1: Plan Your Design
Before you glue anything, decide what shape you want. Most people build a simple square or hexagon base. A square base is easier for beginners.
Lay your sticks flat on a table and arrange them into the shape you like. Count how many sticks you need for each layer. Write it down. This small planning step saves you from making mistakes later.
2: Build the Base
Start with the bottom of the stand. Place two sticks parallel to each other. Then place two more sticks on top, crossing at the ends to form a square shape.
Apply glue at every point where two sticks touch. Press firmly and hold for a few seconds. Wait for the glue to dry before adding the next layer.
Repeat this process. Add layer after layer until the walls of your stand reach the height you want. Most stands look great with eight to twelve layers.
3: Create the Platform for the Pot
Now you need a flat surface inside the stand to hold your pot.
Lay sticks side by side across the inside of your square base. Glue them down securely. This platform keeps your pot steady and prevents it from falling through.
Make sure the platform is strong enough to hold the weight of a pot filled with soil. Add extra sticks if needed.
4: Let Everything Dry Completely
This step is important. Do not rush it.
Let your entire stand dry for at least one hour. If you used a hot glue gun, thirty minutes is usually enough. But craft glue needs more time.
Touch the joints gently to test. If anything moves, add more glue and wait again.
How to Paint and Decorate Your Stand
This is where your stand goes from simple to stunning.
Choose Your Color Scheme
Think about where you will place the stand. A white stand with gold accents looks elegant on a balcony. Bright yellow or green works beautifully in a garden. Earthy tones like brown and terracotta feel warm and natural inside the home.
You do not have to use just one color. Mixing two or three colors that go well together creates a beautiful effect.
How to Paint Ice Cream Sticks Properly
Sand your stand lightly before painting. This helps the paint stick better. Wipe off any dust afterward.
Apply your first coat of paint. Use thin, even strokes. Let it dry completely.
Apply a second coat. Two thin coats always look better than one thick coat.
Once the paint is dry, add any details you want. Dots, stripes, and small flowers are easy patterns that look great.
Seal It for a Long-Lasting Finish
After painting, apply a thin layer of clear varnish or Mod Podge. This protects your paint from moisture and wear. It also gives the stand a nice finished look.
Let the varnish dry fully before you place your pot inside.
3 Design Ideas to Inspire You
Not sure what style to go for? Here are three popular looks that people love.
1. Boho Natural Style
Keep the sticks unpainted or use a light honey-brown stain. Wrap the top edge with twine or jute rope. Place a terracotta pot inside with a succulent or cactus. This looks amazing on a wooden shelf or window sill.
2. Bright and Cheerful Garden Style
Paint the stand in bright colors like yellow, pink, and orange. Use different colors on each layer for a fun striped effect. Plant something with colorful flowers like marigolds or petunias. This style is perfect for balconies and outdoor spaces.
3. Minimalist Modern Style
Paint the entire stand white or matte black. Keep decoration simple. Place a sleek white pot inside with a small fern or peace lily. This works beautifully in modern apartments.
How to Add Soil and Seeds the Right Way
Your stand is ready. Now it is time to bring it to life with plants.
Choosing the Right Pot
Your plastic or clay pot should fit snugly on the platform inside your stand. It should not be so tight that it is hard to remove, but it should not wobble either.
Make sure your pot has drainage holes at the bottom. This is very important. Without drainage, water stays in the soil and roots can rot.
Filling With Soil
Use good quality potting mix. Regular garden soil is often too heavy and can compact too much inside a small pot.
Fill the pot about two thirds of the way. Then add your seeds or plant. Cover seeds with a thin layer of soil according to the packet instructions.
Best Plants for This Type of Stand
Some plants work better than others in small pots. Here are great options:
- Marigolds are easy to grow from seed and bloom quickly
- Basil is useful in the kitchen and grows well indoors
- Succulents need almost no care and stay small
- Petunias produce beautiful flowers all season
- Peace lilies thrive in low light and look elegant
Water your plant gently after planting. Place the pot in your decorated stand. Find a good spot with the right amount of light for your chosen plant.
Common Mistakes to Avoid
Even easy projects have common problems. Here is what to watch out for.
Not using enough glue. Weak joints will come apart. Use enough glue at every connection point.
Rushing the drying time. It is tempting to move fast. But wet glue cannot support weight. Be patient.
Applying paint too thick. Thick paint drips and peels. Always use thin coats and let each one dry before adding another.
Choosing the wrong size pot. Measure your pot before you start building. Build the stand to fit your specific pot.
Not sealing the paint. Moisture from watering can ruin your paint job quickly. Always seal your finished stand.
Why This Project Is Great for Kids Too
This craft is not just for adults. Kids love it too.
It teaches patience and attention to detail. It builds confidence when the project comes together. And caring for a plant afterward teaches responsibility.
Supervise young children around hot glue guns. For kids under ten, regular craft glue is safer and works just as well.
This is a perfect weekend activity for families. Everyone can make their own stand and decorate it however they like.
How to Display Your Ice Cream Stick Flower Pot Stand
Placement makes a big difference. Here are some spots where this stand looks amazing.
- On a windowsill where plants can get natural light
- On a balcony railing shelf for outdoor curb appeal
- On a bathroom shelf with a small succulent
- On a kitchen counter with a herb plant like basil or mint
- On a study desk for a calming, green touch
Group two or three stands of different heights together for a gorgeous display. Vary the colors and plant types for visual interest.
Start Your Ice Cream Stick Flower Pot Today
You now have everything you need. The materials are cheap and easy to find. The steps are clear and simple. The result is genuinely beautiful.
This project proves that you do not need to spend a lot of money to make your home look great. You just need a little creativity and some free time.
Here is your challenge. Gather your craft sticks this weekend. Pick your colors. Build your stand. Share a photo of your finished project in the comments below. We would love to see what you create.
And if you found this guide helpful, share it with a friend who loves DIY crafts. The more people who try this, the better.
Your beautiful flower pot stand is waiting. Go make it.