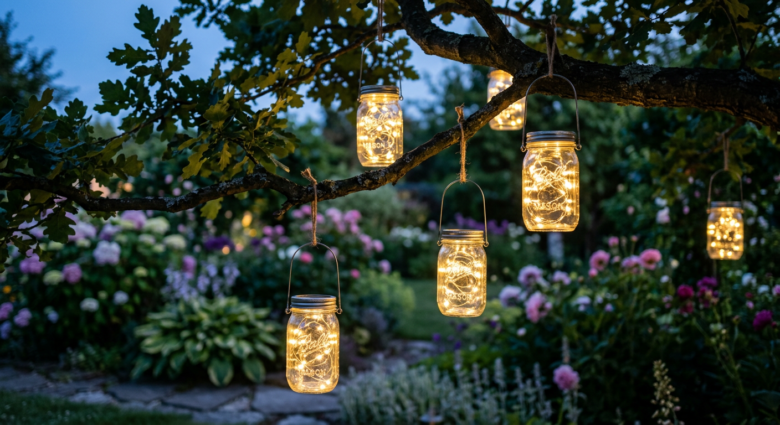
You want your patio to feel magical at night. You scroll through home decor pictures and see gorgeous outdoor lighting that costs hundreds of dollars. Your heart sinks because your budget is tight.
Here’s the good news: you can create stunning DIY hanging jar lights for less than $20. You don’t need special skills. You don’t need fancy tools; just a few simple materials and about 30 minutes of your time.
This guide will show you exactly how to build beautiful hanging jar lights step by step. You’ll learn which materials work best, how to avoid common mistakes, and how to customize your lights to match your style. By the end, you’ll have gorgeous lights that make your friends ask, “Where did you buy those?”
Watch the full step-by-step video here
Why DIY Hanging Jar Lights Work So Well
Mason jar lights have been popular for years, and there’s a simple reason why. They cast a warm, soft glow that makes any space feel cozy. The glass diffuses light in a way that plastic never can.
You can hang them on your porch, in your garden, along a fence, or even indoors. They work for everyday ambiance or special events like parties and weddings. Plus, when you make them yourself, you control the style, size, and color.
What You Need to Make DIY Hanging Jar Lights
Let’s keep this simple. Here’s your shopping list:
Essential Materials:
- Mason jars (any size, but quart jars work best)
- Wire or jute rope for hanging
- LED tea lights or battery operated fairy lights
- Wire cutters
- Pliers
Optional Supplies:
- Acrylic paint for decorating
- Ribbons or lace
- Hot glue gun
- Spray paint
- Sand or small rocks for weight
You can find mason jars at dollar stores, thrift shops, or online. Don’t buy expensive craft store jars. Regular canning jars work perfectly.
For the lights inside, stick with LED options. Real candles look romantic but create safety issues when hanging. According to experts at Better Homes & Gardens, LED lights last longer and eliminate fire risks in outdoor decor projects.
How to Build Your DIY Hanging Jar Lights
Let’s get to the fun part. Follow these steps and you’ll have working lights in less than an hour.
1: Clean Your Jars
Wash your mason jars with soap and warm water. Remove any labels and sticky residue. Dry them completely inside and out. Any moisture will make paint or glue fail later.
2: Create the Hanging Mechanism
You have two easy options here.
Option A: Wire Handle
- Cut a piece of wire about 18 inches long
- Wrap it around the jar neck, just below the threads
- Twist the wire tight to secure it
- Form the remaining wire into a handle loop above the jar
- Use pliers to tighten and smooth any sharp ends
Option B: Rope Hanger
- Cut jute rope about 30 inches long
- Tie it around the jar neck in a secure knot
- Create a loop at the top for hanging
- Add a dab of hot glue under the knot to prevent slipping
Wire looks more rustic and industrial. Rope gives a farmhouse feel. Pick what matches your style.
3: Add Your Light Source
Drop LED tea lights into each jar. If you’re using fairy lights, coil them inside the jar for a magical sparkle effect.
Battery operated lights work best because you can turn them on and off easily. Some come with timers, which saves you from climbing up every night.
4: Decorate (Optional)
This is where your personality shines through. You can leave the jars clear for a clean look, or customize them. We’ll cover specific design ideas in the next section.
5: Hang and Enjoy
Use hooks, tree branches, shepherd’s hooks, or existing structures to hang your lights. Space them evenly for the best effect. Turn them on at dusk and watch your space transform.
5 Design Ideas for Your DIY Hanging Jar Lights
Your basic jar lights are done, but let’s make them special. Here are simple ways to customize them.
1. Frosted Glass Look
Spray the outside of your jars with frosted glass paint. This creates a soft, diffused glow that feels elegant. You can find this paint at any craft store or on Amazon. Let it dry for 24 hours before hanging.
2. Color Pop Jars
Paint the inside of your jars with acrylic paint in any color. Swirl the paint around to coat the inside, then pour out the excess. Let it dry upside down. The light will shine through with a colored tint. This works great for themed parties or matching your outdoor cushions.
3. Lace Wrapped Romance
Wrap lace ribbon around the outside of the jar and secure with hot glue. This creates beautiful shadow patterns when the light shines through. Perfect for weddings or a shabby chic garden look.
4. Natural Garden Style
Skip the paint and add natural elements. Put a layer of sand or small pebbles in the bottom of each jar for stability. Tie twine or burlap around the neck. This style works beautifully in garden settings and complements plants naturally.
5. Painted Pattern Jars
Use painter’s tape to create stripes or geometric patterns on your jars. Paint over the tape, let it dry, then peel the tape off. You’ll have crisp, modern designs that look professionally made.
The Craft Council recommends using outdoor rated paint if your jars will face weather exposure, as it prevents chipping and fading.
5 Mistakes to Avoid with DIY Hanging Jar Lights
I’ve made these mistakes so you don’t have to. Learn from my errors and save yourself frustration.
1: Using Cheap Wire That Breaks
Dollar store wire might save you a dollar, but it breaks under the weight of the jar. Invest in proper gauge wire from a hardware store. You want 16 or 18 gauge wire that won’t snap when the jar swings in wind.
2: Forgetting About Rain
If you hang your lights outside, rain will get inside. Either bring them in during storms or drill a small drainage hole in the bottom of each jar. Without drainage, water pools and ruins your lights.
3: Making the Hanger Too Short
Short hangers look awkward and limit where you can hang your lights. Make your wire or rope handles at least 6 inches tall. This gives you flexibility in placement and looks more balanced.
4: Using Real Candles
Real flames and hanging glass jars create danger. Wind can blow jars into each other or knock them down. Melting wax makes a mess. Just use LED lights. They look nearly identical and you can actually relax and enjoy them.
5: Hanging Too Many in One Spot
More isn’t always better. A cluster of 3 to 5 jars looks intentional and beautiful. Twenty jars crammed together looks chaotic. Space your DIY hanging jar lights with purpose for maximum impact.
How to Use Your Lights in Different Spaces
These versatile lights work almost anywhere. Here’s how to get the most from them in various settings.
Balcony and Patio Lighting
Hang your jar lights from balcony railings or patio covers. They provide enough light for evening conversations without being too bright. Mix different heights for visual interest.
Garden Path Markers
Use shepherd’s hooks along a garden path and hang one jar on each. They guide guests through your yard and highlight your favorite plants. This creates ambiance for outdoor dinners or garden parties.
Indoor Accent Lighting
DIY hanging jar lights aren’t just for outdoors. Hang a row of them above a kitchen island, in a reading nook, or along a hallway. They add character that regular light fixtures can’t match.
Event and Party Decor
These lights are perfect for weddings, birthday parties, and celebrations. Make a bunch in matching colors, hang them from trees or tent poles, and create instant atmosphere. After the event, you can use them at home.
Caring for Your DIY Hanging Jar Lights
Make your lights last for years with simple maintenance.
Clean the jars every few months. Dust and dirt reduce the light quality. Just wipe them down with a damp cloth.
Replace batteries in your LED lights as needed. Keep spare batteries on hand so your lights don’t go dark mid-party.
If you use painted jars outdoors, expect some fading after a year. Touch up the paint or embrace the weathered look. Both work.
Before winter storms or harsh weather, bring your lights inside. Glass can crack in extreme temperature changes.
Store your lights in a box with dividers or wrapped in newspaper to prevent breaking during the off season.
Cost Breakdown: What You’ll Actually Spend
Let’s talk real numbers. Here’s what this project costs:
- Mason jars: $1 to $3 each (cheaper if bought in bulk)
- Wire or rope: $3 to $5
- LED tea lights: $1 to $2 each
- Optional paint and decorations: $5 to $10
Total cost for a set of 5 lights: $15 to $30
Compare that to buying similar lights online, which can cost $60 to $150 for a set. You’re saving serious money while creating something unique.
Making Your DIY Hanging Jar Lights Last Longer
Quality matters more than quantity. Here’s how to build lights that survive seasons instead of weeks.
Use thick jars. Thin glass breaks easily when it bumps into things. Genuine Ball or Kerr brand mason jars are tougher than generic versions.
Seal painted designs with a clear acrylic sealer. This protects your artwork from moisture and UV rays.
Choose rust resistant wire. Galvanized or coated wire won’t leave orange stains or weaken over time.
Tighten your hangers periodically. Wire and rope can loosen as jars swing in the breeze. A quick check every month keeps them secure.
Troubleshooting Common Issues
Sometimes things don’t go perfectly. Here are quick fixes for common problems.
Jar keeps slipping from the wire: Add a rubber band around the jar neck under the wire for extra grip, or use hot glue to anchor the wire in place.
Light looks too dim: Use brighter LED bulbs, or place reflective material like aluminum foil in the bottom of the jar to bounce light upward.
Paint is chipping: You likely didn’t clean the jar well enough before painting. Strip the old paint, clean thoroughly with rubbing alcohol, and repaint.
Rope is fraying: Seal the cut ends with clear nail polish or a lighter flame to prevent unraveling.
Safety Tips for DIY Hanging Jar Lights
Keep these points in mind for worry free lighting.
Always use battery operated or solar LED lights. Never use electrical cords with hanging jars outdoors unless they’re rated for outdoor use.
Hang your lights where people won’t bump their heads. Eye level is too low. Aim for at least 7 feet high in walking areas.
Secure your hooks properly. A jar falling from height can cause injury. Test each hanging point by tugging firmly before adding the jar.
Keep lights away from dry leaves, paper decorations, or anything flammable. Even LED lights generate small amounts of heat.
If you’re hanging many jars from one branch or beam, check the weight capacity. Spread them across multiple support points if needed.
Taking Your DIY Hanging Jar Lights to the Next Level
Once you’ve mastered basic jar lights, try these advanced ideas.
Add solar lids that charge during the day and automatically light at night. You can buy these lids separately and they eliminate the battery replacement task.
Create color changing effects by using RGB LED lights with remote controls. You can match your lights to holidays or moods.
Build a chandelier by hanging multiple jars at different heights from a wooden board or metal ring. This creates a stunning focal point for outdoor dining areas.
Mix jar sizes for visual variety. Combine pint, quart, and half gallon jars in one display for a collected, organic look.
According to Popular Mechanics, adding a small amount of Epsom salt to the bottom of each jar before adding lights creates a snowy, crystalline effect that catches and reflects light beautifully.
Your Next Steps: Start Building Today
You now have everything you need to create beautiful DIY hanging jar lights. This project is beginner friendly, budget conscious, and creates real impact in your space.
Start with just three jars. See how you like the process and the results. Once you see how easy and impressive they are, you’ll want to make more.
Grab some mason jars this weekend. Spend an hour making your first set. Hang them up as the sun sets and watch your space transform.
Share your creations with friends and family. These lights make wonderful gifts that show you care enough to create something by hand.
Try this project this week. Your outdoor space is waiting for that magical glow. When your neighbors ask where you bought those beautiful lights, you’ll smile and say you made them yourself.
Leave a comment below and tell us how your DIY hanging jar lights turned out. What design did you choose? Where did you hang them? We’d love to hear about your experience and see your photos.
Now get out there and start creating. Your beautiful, budget friendly lighting is just a few simple steps away.