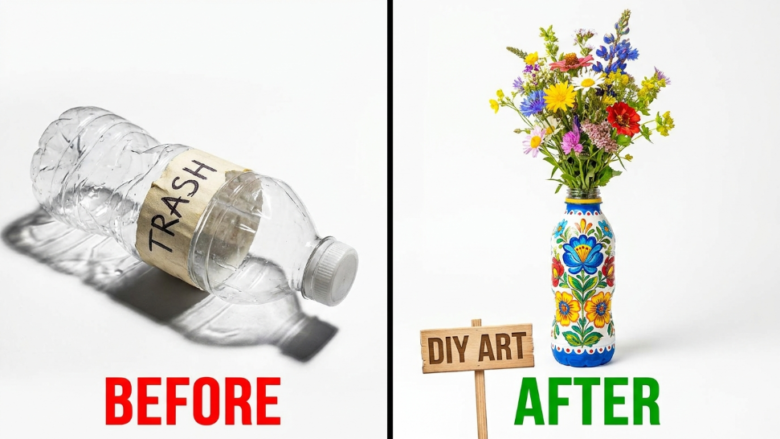
You toss it in the bin without a second thought. That empty plastic bottle — the one that held your water, your soda, your juice — seems completely worthless the moment its contents are gone. But what if that “worthless” piece of trash could become a stunning vase, a gorgeous planter, or an eye-catching piece of home decor that your guests can’t stop complimenting?
This DIY will change the way you see “trash” forever, and we’re not exaggerating. In just a few minutes, with materials you already have at home, you can transform ordinary plastic bottles into something genuinely beautiful. Whether you’re passionate about sustainability, love creative projects, or simply want to save money on home decor, this guide is for you.
Let’s dive in.
Why Upcycling Plastic Bottles Matters More Than Ever
Before we get into the hands-on tutorial, let’s talk about why this matters.
Every single minute, approximately one million plastic bottles are purchased worldwide. The vast majority of these end up in landfills or, worse, in our oceans. According to the United Nations Environment Programme, only about 9% of all plastic ever produced has been recycled. The rest? It sits in the environment for up to 450 years before decomposing.
When you upcycle a plastic bottle into something functional or decorative, you’re doing more than crafting. You’re actively reducing waste, cutting down on the demand for new materials, and proving that sustainability can be beautiful.
This isn’t just a craft project. It’s a mindset shift. And once you experience it, this DIY will change the way you see “trash” forever.
What You’ll Need: Simple Supplies for Stunning Results
One of the best things about this project is that it requires minimal supplies — most of which you probably already own. Here’s your complete materials list:
Essential Materials:
- Empty plastic bottles (any size — water bottles, soda bottles, or larger juice containers)
- Sharp scissors or a craft knife
- Acrylic paint (in your preferred colors)
- Paintbrushes (various sizes)
- Hot glue gun and glue sticks
- Twine, ribbon, or decorative rope
- Sandpaper (fine grit, optional)
Optional Embellishments:
- Artificial flowers or dried flowers
- Beads, sequins, or rhinestones
- Fabric scraps or lace
- Spray paint (for a smoother finish)
- Mod Podge or clear sealant
- Markers or paint pens for detailed designs
That’s it. No specialty tools. No expensive equipment. No trip to a fancy craft store required.
Step-by-Step Guide: Turning a Plastic Bottle into a Beautiful Vase
Now for the part you’ve been waiting for. Follow these detailed steps to create a stunning decorative vase from a simple plastic bottle.
1: Clean and Prepare Your Bottle
Start by thoroughly washing your plastic bottle with warm, soapy water. Remove all labels and adhesive residue. A little rubbing alcohol on a cotton pad works wonders for stubborn sticker residue.
Pro Tip: Soak the bottle in warm water for 10–15 minutes to make label removal effortless.
Once clean, dry the bottle completely. Any remaining moisture can interfere with paint adhesion.
2: Cut and Shape the Bottle
Decide on the shape you want. Here are three popular options:
- Classic Vase: Cut the top third of the bottle off to create an open-top vase shape.
- Wavy Edge Vase: Cut the top off and then cut petal-shaped or wavy patterns along the rim for a decorative edge.
- Full Bottle Design: Keep the bottle intact and decorate it as-is for a more unique silhouette.
Use sharp scissors or a craft knife for clean cuts. If the edges feel rough, gently sand them with fine-grit sandpaper.
3: Apply a Base Coat of Paint
This is where the transformation really begins — and where you’ll start to understand why this DIY will change the way you see “trash” forever.
Apply a generous base coat of acrylic paint to the entire exterior of the bottle. White or a light neutral color works best as a base because it allows subsequent colors to appear vibrant and true.
Key Tips for Painting Plastic:
- Apply paint in thin, even layers
- Allow each coat to dry completely before adding the next (usually 15–20 minutes)
- Two to three coats typically provide full, opaque coverage
- For the smoothest finish, use spray paint for your base coat
4: Add Your Creative Design
This is where your personality shines. There are countless directions you can take:
Minimalist Aesthetic:
Paint the bottle in a single solid color — matte white, terracotta, sage green, or dusty pink are all trending in home decor right now. Wrap a section of the bottle with twine or jute rope for added texture.
Bohemian Vibes:
Use paint pens or fine brushes to add geometric patterns, mandalas, or abstract dots. Earth tones and metallic accents work beautifully here.
Rustic Farmhouse Style:
Paint the bottle white, lightly sand certain areas to create a distressed look, and tie a burlap ribbon around the neck. Add a small tag with a handwritten word like “bloom” or “home.”
Elegant and Glamorous:
Use metallic spray paint (gold, rose gold, or chrome) for a luxurious finish. Add rhinestones, pearls, or glitter accents with your hot glue gun.
Nature-Inspired:
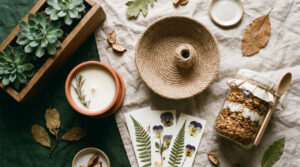
Decoupage dried leaves, pressed flowers, or botanical prints onto the painted surface using Mod Podge.
5: Seal and Protect Your Creation
Once your design is complete and fully dry, apply a clear sealant or a coat of Mod Podge over the entire surface. This protects your artwork from chipping, peeling, or fading over time.
Allow the sealant to cure for at least 24 hours before handling or displaying.
6: Style and Display
Place dried flowers, artificial blooms, or decorative branches in your finished vase. Position it on a shelf, mantle, windowsill, or dining table. Group several upcycled vases of varying heights and colors together for a curated, designer-worthy display.
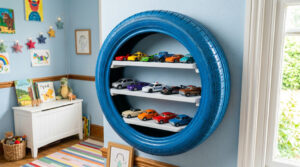
5 More Incredible Things You Can Make from Plastic Bottles
Once you’ve mastered the vase, the creative possibilities are endless. Here are five more projects that prove this DIY will change the way you see “trash” forever:
1. Self-Watering Planters
Cut a bottle in half. Invert the top portion into the bottom half, thread a cotton string through the cap opening, fill the bottom with water, and add soil and a small plant to the top. The string wicks water up to the roots automatically.
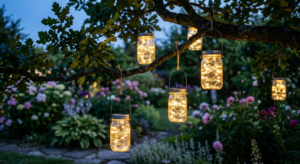
2. Decorative Lanterns and Luminaries
Cut patterns or shapes into a painted bottle, place a battery-operated tea light inside, and watch the light dance through the cutouts. Perfect for outdoor evenings or cozy bedroom ambiance.
3. Jewelry and Accessory Organizers
Cut bottles at various heights, paint and decorate them, and use them to store bracelets, hair ties, makeup brushes, and pens on your vanity or desk.
4. Bird Feeders
Cut openings on opposite sides of a bottle, insert wooden spoons or dowels as perches, fill with birdseed, and hang in your garden. Functional, charming, and eco-friendly.
5. Gift Containers
Transform small bottles into personalized gift containers. Fill them with candy, bath salts, or small trinkets. Decorate the exterior to match the occasion — birthdays, holidays, weddings, or baby showers.
Why This DIY Will Change the Way You See “Trash” Forever
There’s something profoundly satisfying about holding a finished piece in your hands and knowing it started as something destined for a landfill. This project does more than produce a pretty object. It fundamentally rewires how you think about waste.
After completing your first upcycled creation, you’ll start noticing potential everywhere:
- That glass jar? A future candle holder.
- Those old tin cans? Herb garden planters.
- That cardboard box? A stylish storage organizer.
You begin to see possibility instead of waste. And that shift in perspective is worth more than any single craft project.
The Benefits Beyond Beauty:
- Environmental Impact: Every bottle you upcycle is one less in a landfill
- Cost Savings: Create decor that looks expensive for virtually nothing
- Mental Wellness: Crafting reduces stress, boosts mood, and fosters mindfulness
- Family Bonding: These projects are perfect for kids and adults alike
- Unique Style: No two pieces are identical — your decor truly becomes one-of-a-kind
Tips for Beginners: How to Get the Best Results
If you’re new to upcycling or DIY projects, these tips will set you up for success:
- Start simple. Choose a straightforward design for your first project and build complexity as your confidence grows.
- Watch tutorials. Visual learners benefit enormously from watching the process in action before starting.
- Embrace imperfection. Handmade items have character. Small irregularities add charm, not flaws.
- Use quality paint. Cheap acrylic paint often requires more coats and doesn’t adhere to plastic as well. Invest in a decent brand.
- Let layers dry fully. Patience is the single most important ingredient in any painting project.
- Experiment freely. There’s no “wrong” way to upcycle. If you don’t like the result, paint over it and start again.
Share Your Creations and Join the Movement
The upcycling community is thriving, and your voice matters. When you complete your project, share it on social media using hashtags like #UpcycledDecor, #PlasticBottleDIY, #TrashToTreasure, and #DIYHomeDecor. You’ll inspire others to rethink their relationship with waste — and you might just discover a new passion in the process.
Final Thoughts
We live in a world that produces an overwhelming amount of waste. But within that waste lies incredible creative potential — you just have to see it. A single plastic bottle, a few basic supplies, and a little imagination are all it takes to create something genuinely stunning.
This DIY will change the way you see “trash” forever — not because the craft itself is complicated, but because it opens your eyes. Once you realize that beauty can emerge from what others discard, you’ll never look at an empty bottle the same way again.
So grab that bottle from your recycling bin, pick up a paintbrush, and start creating. Your next masterpiece is already waiting — disguised as trash.