There’s nothing quite like the sight of vibrant tulips blooming in spring—bold colors, delicate petals, and a touch of elegance that transforms any garden into a masterpiece. But for many gardeners, planting tulip bulbs can feel like a daunting task. Spacing, depth, and timing are crucial, and even a small mistake can lead to disappointing results.
Enter the Egg Carton Hack—a viral, genius gardening trick that’s taking the internet by storm. With just a simple egg carton and a few minutes of your time, you can plant 12 tulip bulbs perfectly spaced, every single time—in under 60 seconds!
Whether you’re a seasoned gardener or a total newbie, this article will give you everything you need to plant your tulip bulbs with perfect spacing, maximum blooms, and zero stress.
Also Check Our Guide on Youtube!
Why This Egg Carton Tulip Planting Hack Is Going Viral
Gardening hacks have always been popular, but this one is different. Unlike complicated tools or expensive equipment, this method uses a free, everyday item—an egg carton—to solve one of the biggest challenges in bulb planting: spacing.
The Problem With Traditional Tulip Planting
Most gardeners dig individual holes for each bulb, trying to eyeball the perfect spacing. But human error is inevitable. You might end up with bulbs too close together, crowding each other out, or too far apart, wasting space and reducing your bloom count.
Even worse, planting bulbs at the wrong depth can lead to weak growth or no blooms at all.
The Egg Carton Solution
The egg carton naturally creates perfect spacing. Each cup acts as a mold, ensuring that every bulb is planted at the exact same depth and distance from its neighbors. It’s fast, easy, and guaranteed to work—no matter your gardening experience.
And the best part? You probably already have an egg carton at home!
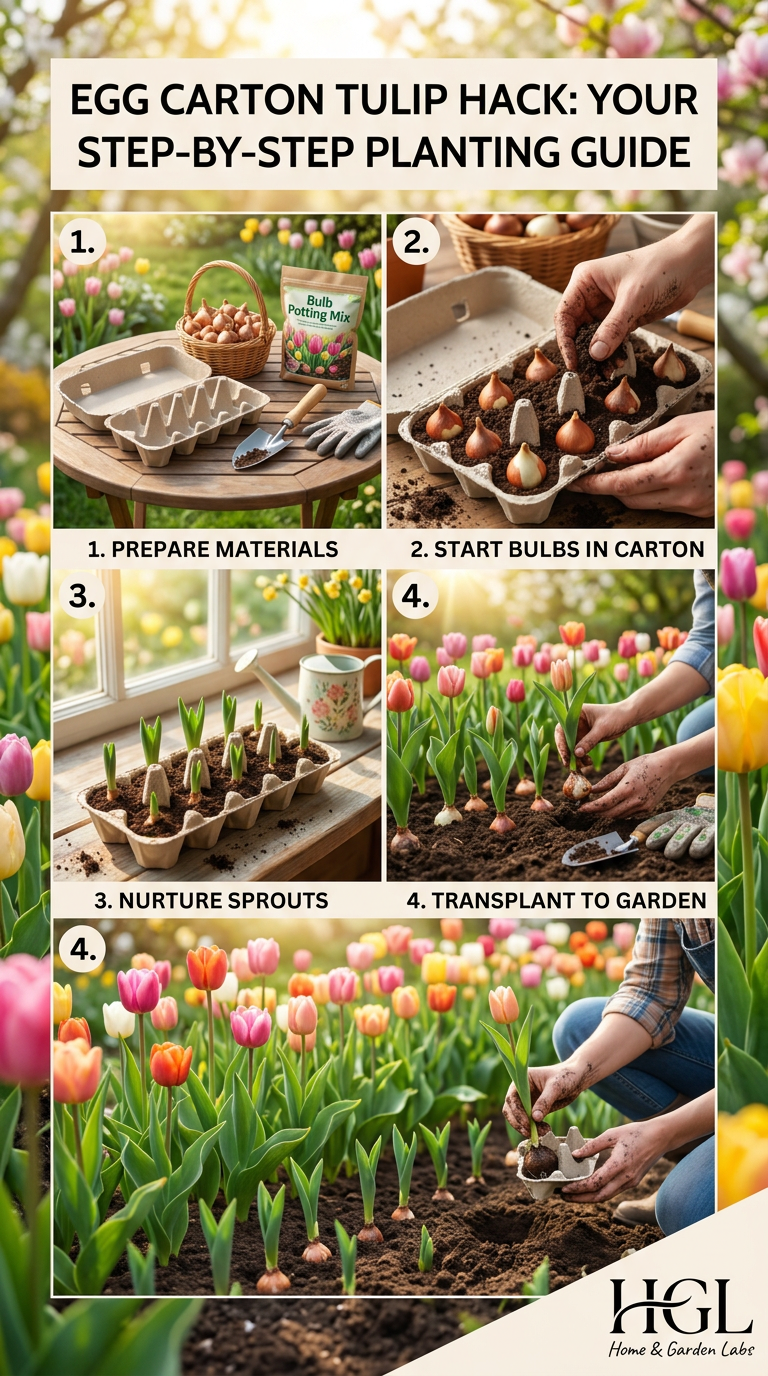
5 Simple Steps to Plant 12 Tulip Bulbs in Under 60 Seconds
Ready to try the hack that’s sweeping gardens across the country? Follow these 5 foolproof steps, and you’ll have your tulips planted before your morning coffee is done.
1: Dig a Trench — Not Individual Holes
Instead of digging 12 separate holes, which can be time-consuming and inaccurate, dig one long, straight trench.
- Depth: 6 inches (this is the optimal depth for most tulip bulbs)
- Length: Enough to fit your egg carton flat on the bottom
- Width: About 6 inches wide — wide enough to fit the egg carton comfortably
Pro Tip: Use a garden hose to help guide the trench straight, or lay down a piece of cardboard first to mark the line.
2: Lay the Egg Carton Flat in the Trench
Now, place your clean, empty egg carton flat on the bottom of the trench. Make sure it’s lying completely flat—this ensures that each bulb is planted at the same depth.
Important: Use a cardboard egg carton, not a plastic one. Cardboard breaks down naturally over time and won’t interfere with root growth.
3: Place One Bulb in Each Cup
Here’s where the magic happens. Drop one tulip bulb into each cup of the egg carton.
- Orientation Matters: Always point the pointy end of the bulb upward. This is the growing tip, and planting it this way encourages strong, upright growth.
- No Crowding: The egg carton ensures that each bulb has plenty of room to develop without competition.
4: Cover Completely with Soil
Once all 12 bulbs are in place, begin filling the trench with soil.
- Fill Gradually: Add soil in layers and gently press it down to eliminate air pockets.
- Level the Surface: When you’re done, the soil should be level with the surrounding ground.
5: Water Thoroughly
Give the newly planted bulbs a good watering. This helps settle the soil and encourages root development.
- How Much? Aim for about 1 inch of water over the area.
- When? Water right after planting, and then keep the soil moist but not soggy throughout the fall and winter.
Time to Complete: Most gardeners finish this entire process in under 60 seconds once the trench is dug!
What to Expect in Spring: 12 Perfectly Spaced Tulips
When spring arrives, you’ll be rewarded with 12 stunning tulips, each blooming at the same time and spaced perfectly apart.
Why This Method Delivers Results Every Time
- Consistent Depth: All bulbs are planted at the same depth, which is crucial for proper development.
- Ideal Spacing: Tulips need about 6–8 inches between them to grow properly. The egg carton naturally provides this spacing.
- Reduced Stress: No more guessing or measuring—just drop and go!
Bloom Time
Most tulip varieties bloom late spring to early summer, depending on your climate. In colder regions, look for blooms in April or May. In warmer zones, they may bloom a bit later.
Pro Tips for Maximum Tulip Success
Now that you know how to plant your tulips using the egg carton hack, let’s dive into some expert tips that will help you get the most beautiful, longest-lasting blooms.
1. Plant in Autumn for Spring Blooms
Tulips are cool-season plants, which means they need exposure to cold temperatures to trigger blooming. For most gardeners, that means planting in late summer to early fall—typically September or October.
Planting Window: Plant when the soil temperature drops below 60°F.
2. Use Fresh, High-Quality Bulbs
Not all tulip bulbs are created equal. For the best results:
- Choose Large, Firm Bulbs: Avoid soft or shriveled bulbs.
- Look for A-Grade Bulbs: These are the largest and most likely to bloom.
- Buy from Reputable Sources: Local garden centers or trusted online nurseries often carry high-quality bulbs.
3. Add Organic Matter to Enrich the Soil
Tulips thrive in nutrient-rich soil. Before planting, mix in some compost or well-rotted manure to boost soil health.
4. Mulch After Planting
Once the soil has frozen in winter, apply a 2–3 inch layer of mulch (like straw or shredded leaves) over the planting area. This:
- Insulates the bulbs from extreme temperature fluctuations
- Suppresses weeds
- Retains moisture
5. Avoid Fertilizing Right After Planting
Wait until spring to apply fertilizer—after the leaves appear. A balanced, low-nitrogen fertilizer encourages strong blooms without encouraging excessive foliage.
6. Don’t Forget About Pest Protection
Tulips are generally hardy, but they can be vulnerable to pests like squirrels or deer. If you live in an area with wildlife issues:
- Use mesh covers over the trench before planting
- Plant in less accessible areas of your garden
- Use organic repellents if needed
Common Mistakes to Avoid When Planting Tulips
Even with the egg carton hack, a few common mistakes can holding back your tulip success. Here’s what not to do:
Mistake #1: Planting Too Shallow or Too Deep
- Too Shallow: Bulbs may dry out or fail to bloom.
- Too Deep: Bulbs may rot or fail to emerge.
Solution: Always plant tulips 6 inches deep. The egg carton makes this easy!
Mistake #2: Ignoring Soil Drainage
Tulips hate wet feet. If your soil drains poorly, your bulbs could rot over winter.
Solution: Add gravel or sand to improve drainage, or plant in a raised bed if necessary.
Mistake #3: Forgetting About Winter Protection
In very cold climates, bulbs can be damaged by freezing and thawing.
Solution: Use mulch in winter to protect the soil from extreme temperature swings.
Mistake #4: Planting Too Close Together
Even with the egg carton, you might accidentally squeeze bulbs together if the carton is too small.
Solution: Use a standard 12-cup egg carton and avoid squishing the bulbs.
FAQs: Your Tulip Planting Questions, Answered
Q: Can I Use This Hack for Other Bulbs?
A: Absolutely! The egg carton method works great for daffodil, crocus, and hyacinth bulbs too. Just adjust the depth based on the bulb type.
Q: What If It Gets Too Cold to Plant in Autumn?
A: If the ground freezes before you can plant, you can plant in early spring—as soon as the soil is workable. Just ensure the soil temperature is above 40°F.
Q: Do I Need to Dig Up the Bulbs Every Year?
A: No. Tulips can naturalize in your garden for several years if conditions are right. However, if you want maximum bloom size, you can dig up and replant every 3–5 years.
Q: Why Should I Point the Bulb Up?
A: Planting the bulb with the pointy end up ensures that the growing tip develops into a flower stalk, not just foliage.
Q: Can I Use Plastic Egg Cartons?
A: We don’t recommend plastic cartons. They won’t break down naturally and could interfere with root growth. Stick with cardboard for best results.
Why This Hack Beats Traditional Planting Every Time
Let’s break down why this egg carton method is a game-changer:
| Traditional Planting | Egg Carton Hack |
|---|---|
| Time-consuming (digging 12 holes) | Fast (one trench + one carton) |
| Inconsistent spacing and depth | Perfectly even spacing and depth |
| Easy to make mistakes | Foolproof and beginner-friendly |
| Requires measuring tools | No tools needed — just an egg carton |
| Higher risk of poor blooms | Higher success rate with proper care |
Call to Action: Try the Hack This Fall and Bloom Like a Pro!
Now that you’ve seen how easy, fast, and effective the egg carton tulip hack is, there’s no excuse not to try it this season!
Grab an egg carton.
Dig your trench this fall.
Enjoy perfect tulips next spring.
Share Your Success!
After you plant your tulips, snap a photo of your blooming garden and share it on social media with the hashtag #EggCartonTulips. We’d love to see your beautiful results!
And if you found this guide helpful, pass it along to fellow gardeners or friends who are tired of struggling with bulb planting. Together, we can make spring simpler, prettier, and more enjoyable for everyone!
Final Thoughts
Planting tulips doesn’t have to be complicated. With the viral egg carton hack, you can plant 12 perfect tulips in under 60 seconds—with zero stress and guaranteed blooms.
From digging the right depth to spacing bulbs like a pro, this method takes the guesswork out of gardening and puts the joy back into springtime decorating.
So grab that egg carton, get your hands in the soil, and get ready to welcome a wave of color, beauty, and fragrance into your garden this spring!