In the world of sustainable home decor, few trends combine functionality, aesthetics, and eco-consciousness quite like wall-mounted propagation stations. If you’ve been tossing plant trimmings into the compost bin, you’re literally throwing away free home decor and the opportunity to expand your plant collection exponentially.
Wall propagation displays transform ordinary clippings into conversation-starting living art installations. This modern approach to plant parenting not only reduces waste but creates a stunning focal point that bridges the gap between contemporary minimalism and rustic charm. Whether you’re a seasoned plant enthusiast or just beginning your green journey, a wall-mounted propagation station offers an innovative way to showcase nature’s growth process while adding dimension and life to your space.
In this comprehensive guide, we’ll walk you through everything you need to know about creating your own wall propagation gallery, from selecting the perfect vessel to troubleshooting common challenges.
What Exactly Is a Wall-Mounted Propagation Station?
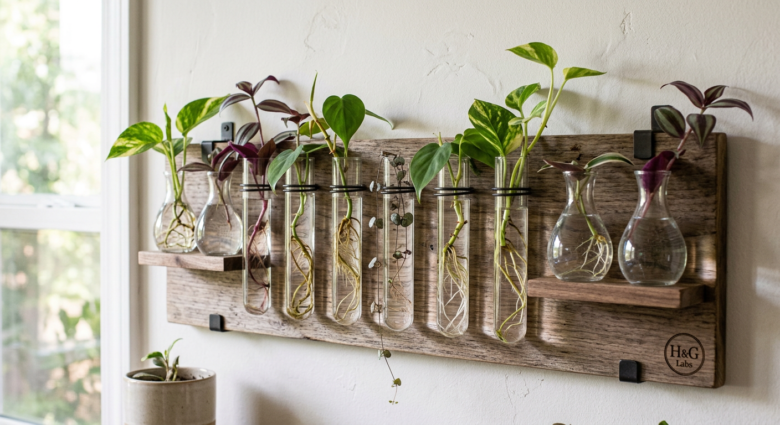
A wall-mounted propagation station is essentially a vertical display system designed to hold plant cuttings in water or growing medium while they develop roots. These stations typically feature glass vessels, test tubes, or vials mounted on wood, metal, or acrylic backings that attach securely to your wall.
Unlike traditional propagation methods where cuttings sit on windowsills in mismatched containers, wall stations offer:
- Space efficiency: Vertical growing maximizes limited square footage
- Visual impact: Creates an intentional, gallery-like aesthetic
- Easy monitoring: All your propagating plants in one visible location
- Conversation value: Guests can’t help but comment on this unique decor element
- Educational opportunity: Perfect for teaching kids about plant biology
The beauty of these installations lies in their dual purpose—they’re both functional growing stations and artistic statement pieces that evolve constantly as your cuttings develop roots and leaves.
The Benefits of Creating a Wall Propagation Display
Sustainability Meets Style
Every time you trim a leggy pothos or prune an overgrown philodendron, you’re creating potential new plants. Rather than discarding these trimmings, a propagation station gives them purpose. This aligns perfectly with the growing zero-waste movement and helps you build a plant collection without spending money at nurseries.
Modern-Rustic Aesthetic Appeal
The combination of natural wood backing, clear glass vessels, and fresh greenery creates that coveted modern-rustic vibe that dominates contemporary interior design. This aesthetic works beautifully in:
- Farmhouse-style kitchens
- Industrial loft spaces
- Scandinavian-inspired living rooms
- Bohemian bedrooms
- Minimalist home offices
Cost-Effective Decor Solution
High-end botanical prints and wall art can cost hundreds of dollars. A propagation station provides constantly changing, three-dimensional living art for a fraction of the cost—often under $50 for materials if you’re crafty.
Stress Reduction and Biophilic Benefits
Research consistently shows that interacting with plants reduces cortisol levels and improves overall well-being. A wall propagation station brings nature indoors, contributing to a healthier, more calming environment.
How to Choose the Perfect Location for Your Propagation Wall
Location is critical for propagation success. Your wall station needs adequate light without direct sun exposure that might heat the water and encourage algae growth.
Ideal Locations Include:
- Near east-facing windows: Gentle morning light without harsh afternoon rays
- Well-lit hallways: Often-overlooked spaces that benefit from greenery
- Kitchen walls: Near natural light and water sources for easy maintenance
- Bathroom areas: High humidity benefits many tropical cuttings
- Home office spaces: Within view while working for stress relief
Locations to Avoid:
- Direct south or west-facing windows (too intense)
- Above heat sources like radiators
- Dark corners with no natural light
- High-traffic areas where the station might get bumped
Step-by-Step Guide to Building Your Wall Propagation Station
Materials You’ll Need
For the Mounting Board:
- Reclaimed wood plank (cedar, pine, or walnut for rustic appeal)
- Sandpaper (120 and 220 grit)
- Wood stain or sealant (optional)
- Wall mounting hardware (appropriate for your wall type)
For Plant Holders:
- Glass test tubes, bud vases, or propagation tubes
- Metal or leather tube holders/clips
- Screws or strong adhesive appropriate for your board material
Tools:
- Drill with appropriate bits
- Level
- Measuring tape
- Pencil for marking
- Protective eyewear
Construction Process
1: Prepare Your Board
Start with a wood piece approximately 24-36 inches long and 6-10 inches wide. Sand thoroughly, moving from coarser to finer grit. If you want a darker, more dramatic look, apply wood stain according to manufacturer directions. For a natural finish, simply seal with a food-safe mineral oil or polyurethane.
2: Plan Your Vessel Placement
Before drilling or adhering anything, lay out your glass vessels on the board. Consider creating visual interest through:
- Asymmetrical spacing
- Varying heights
- Staggered rows
- Diagonal patterns
Mark each placement point with a pencil once you’re satisfied with the arrangement.
3: Attach Vessel Holders
Depending on your chosen holder style, either drill pilot holes for screw-mount holders or apply strong adhesive for clip-style holders. Ensure everything is level and secure—these will need to support water-filled vessels.
4: Mount to Wall
Use appropriate wall anchors for your wall type (drywall anchors, masonry screws, etc.). A 30-inch board filled with water and plants can weigh 5-10 pounds, so secure mounting is essential. Use a level to ensure your installation is straight.
5: Insert Vessels and Fill with Water
Place your glass tubes or vases into their holders, fill with room-temperature water (preferably filtered or left out overnight to dechlorinate), and you’re ready for cuttings.
Best Plants for Wall Propagation Stations
Not all plants propagate equally well in water. Focus on these proven performers:
Top Water Propagation Champions:
Pothos (Epipremnum aureum)
- Nearly foolproof
- Roots develop within 1-2 weeks
- Multiple varieties offer color variation (golden, marble queen, neon)
Philodendron Species
- Heart-leaf philodendron especially reliable
- Creates cascading visual interest
- Fast root development
Tradescantia (Wandering Jew)
- Vibrant purple, pink, or green foliage
- Extremely fast growing
- Adds color to your display
Monstera Deliciosa
- Dramatic fenestrated leaves
- Slower to root but worth the wait
- High visual impact
String of Hearts (Ceropegia woodii)
- Delicate, romantic appearance
- Perfect for the rustic aesthetic
- Roots readily in water
Herbs
- Basil, mint, and oregano propagate beautifully
- Functional and decorative
- Wonderful for kitchen installations
Plants to Avoid for Water Propagation:
- Succulents (prone to rot)
- Most cacti
- Plants requiring dry periods between watering
- Species susceptible to root rot
Maintaining Your Living Wall Gallery
Water Management
Change water weekly to prevent bacterial growth and keep oxygen levels high. Cloudy water indicates it’s time for a change. Use room-temperature water to avoid shocking developing roots.
Nutrient Considerations
Once roots develop, consider adding diluted liquid fertilizer at 1/4 strength every 2-3 weeks. This isn’t necessary for rooting but helps cuttings maintain healthy foliage during the propagation period.
Algae Prevention
Green water and slimy glass are common challenges. Combat algae by:
- Keeping the station out of direct sunlight
- Cleaning vessels during water changes
- Using amber-tinted glass bottles
- Adding a small piece of activated charcoal to each vessel
Transitioning Rooted Cuttings
Once roots reach 2-3 inches long, cuttings are ready for soil. This creates space for new cuttings and keeps your display fresh. Rotate cuttings regularly to maintain the “living gallery” concept—your wall should always showcase plants at various growth stages.
Seasonal Adjustments
Growth slows in winter months due to reduced light. Don’t be alarmed if rooting takes longer between November and February. You might also need to adjust your station’s position as the sun’s angle changes with seasons.
Design Ideas to Elevate Your Propagation Wall
Create a Focal Wall
Instead of a single station, install multiple smaller boards in a gallery wall arrangement. Mix propagation stations with complementary elements like:
- Vintage botanical prints
- Macramé plant hangers
- Small floating shelves with potted plants
- Wooden wall letters or signage
Add Ambient Lighting
Install LED strip lights or small picture lights above your propagation station to:
- Supplement natural light during winter
- Create evening ambiance
- Highlight the display as functional art
Incorporate Labels
Use small chalkboard tags, copper plant markers, or calligraphy labels to identify each cutting. This adds an educational element and refines the aesthetic with intentional detail.
Mix Materials
Don’t limit yourself to wood backings. Consider:
- Industrial metal pipes for a modern look
- Macramé wall hangings with integrated tubes
- Repurposed window frames
- Copper or brass mounting hardware for warmth
Color Coordination
Plan your cutting selection around a color palette:
- All-green for minimalist spaces
- Purple and pink tradescantia for romantic vibes
- Variegated plants for eclectic energy
Troubleshooting Common Propagation Station Problems
Cuttings Not Developing Roots
Possible causes:
- Insufficient light
- Wrong plant species for water propagation
- Cutting taken from wrong part of plant
- Water quality issues
Solutions: Ensure your cutting includes at least one node (the bump where leaves emerge), increase light exposure, or try a rooting hormone powder on the cut end before placing in water.
Yellowing Leaves
This often indicates:
- Lack of nutrients (add diluted fertilizer)
- Insufficient light
- Roots outgrowing the vessel (time to pot up)
Mold or Fungus Growth
Remove affected cuttings immediately. Sterilize vessels with diluted bleach solution, refresh all water, and ensure adequate air circulation around your station.
Rotting Stems
Too much stem submerged underwater promotes rot. Only the bottom inch should be in water. Remove rotted sections, recut above the damage, and try again.
Taking Your Propagation Station to the Next Level
Document the Journey
Create time-lapse videos or photo series showing root development. This content performs exceptionally well on platforms like Instagram and Pinterest, potentially turning your hobby into social media content.
Gift Rooted Cuttings
Once cuttings are well-rooted, pot them as thoughtful, personal gifts. Include care instructions and the plant’s origin story—people love knowing their plant came from your collection.
Experiment with Rare Varieties
As you gain confidence, source cuttings of more unusual plants through plant swap groups or online communities. Your propagation station becomes a conversation piece when featuring uncommon varieties.
Integrate Smart Technology
Automated lighting timers, humidity monitors, and even small water circulation pumps can optimize your propagation success while adding a tech-forward element to your installation.
The Environmental Impact of Propagation Stations
Beyond aesthetics, wall propagation stations support sustainability in meaningful ways:
Reducing Consumption
Each successfully rooted cutting is one fewer plant purchased in plastic pots, shipped across distances, and packaged with resources.
Extending Plant Life
Rather than discarding overgrown plants, propagation lets you refresh your collection by rooting the healthiest sections and composting the rest.
Building Community
Plant propagation naturally leads to sharing. As your collection grows, you’ll find yourself gifting plants to friends, family, and neighbors, spreading green spaces throughout your community.
Educational Value
Visible propagation teaches household members—especially children—about plant biology, patience, and the miracle of growth, fostering environmental stewardship.
Cost Breakdown: Budgeting Your Project
Understanding the investment helps you plan appropriately:
Budget Option ($20-40):
- Reclaimed wood board (free or $5-10)
- Basic test tubes from craft stores ($1-2 each)
- Simple screw-in holders ($0.50-1 each)
- Basic mounting hardware ($5-10)
Mid-Range Option ($50-100):
- Finished wood board from home improvement store ($15-25)
- Quality glass bud vases ($3-5 each)
- Metal or leather tube holders ($2-4 each)
- Decorative mounting hardware ($10-20)
Premium Option ($150-300):
- Custom-cut hardwood (walnut, cherry) ($40-80)
- Hand-blown glass vessels ($8-15 each)
- Artisan-crafted metal holders ($5-10 each)
- Professional installation or high-end hardware ($30-50)
- Integrated LED lighting ($30-60)
Remember that cuttings themselves are free, making this an accessible project at any budget level.
Transform Your Space with Living Art
A wall-mounted propagation station represents more than trendy home decor—it’s a commitment to sustainable living, patience, and the joy of nurturing life. This project bridges the gap between functional plant care and artistic expression, creating a dynamic display that evolves daily.
The modern-rustic aesthetic achieved through simple materials like reclaimed wood and glass vessels proves that high-end design doesn’t require high-end budgets. Your plant trimmings, once destined for the trash, become the stars of a living gallery that tells a story of growth, transformation, and connection to nature.
As you watch roots spiral through clear water and new leaves unfurl, you’ll understand why this trend has captured the imagination of plant lovers and design enthusiasts alike. Your wall becomes more than a surface—it becomes a canvas for life itself.
Ready to Create Your Own Living Gallery?
What’s your next step? Gather those clippings you’ve been hesitating to throw away, source your materials this weekend, and join the thousands of plant lovers transforming their walls into dynamic, growing art installations. Your perfect propagation wall is just one project away from becoming the centerpiece of your home’s modern-rustic transformation.
Do Check Our Video Guide on Youtube.
Have questions about plant selection, construction techniques, or troubleshooting? Drop a comment below—our community of propagation enthusiasts is here to help you succeed in turning your trash into treasure and your wall into a living masterpiece.