Have you ever looked at an expensive garden centerpiece and thought, “I could make that myself”? What if the secret to creating breathtaking, one-of-a-kind flower pots was sitting in your linen closet right now? The viral cement-and-towel flower pot technique has taken the DIY gardening world by storm — and for good reason. With just a few affordable materials, some patience, and a spark of creativity, you can craft stunning handmade flower pots that look like they belong in a high-end boutique garden.
In this comprehensive guide, we’ll walk you through every step of the process — from mixing cement to hand-painting beautiful floral designs — so you can create your own garden masterpieces at home. Whether you’re a seasoned craft enthusiast or a complete beginner, this satisfying DIY project is guaranteed to become your new favorite weekend activity.
Why the Cement Towel Technique Is Taking Over DIY Gardens
Before we dive into the how-to, let’s talk about the why. The cement towel flower pot method has gone viral across YouTube, Pinterest, and Instagram for several compelling reasons:
- It’s incredibly affordable. A bag of cement costs just a few dollars, and old towels are materials most people already own.
- Each pot is completely unique. The fabric texture creates gorgeous, organic-looking surfaces that no two pots will ever replicate.
- It’s beginner-friendly. Unlike traditional pottery or woodworking, this technique requires zero specialized skills or expensive equipment.
- The results are stunning. The finished pots genuinely look like professional artisan garden décor worth hundreds of dollars.
- It’s deeply satisfying. There’s something meditative and rewarding about shaping raw cement into something beautiful — which is exactly why these videos rack up millions of views.
From apartment balconies to sprawling backyard gardens, handmade cement flower pots are becoming the go-to choice for anyone who wants to add a personal, artistic touch to their outdoor spaces.
What You’ll Need: Materials & Tools
Getting started is easier than you think. Here’s your complete materials list for this DIY cement flower pot project:
Cement Mixture:
- Portland cement (standard gray or white)
- Sand (optional, for added texture)
- Water
- A large mixing bucket
- Rubber gloves and protective eyewear
- Portland cement safety and mixing guidelines.
Towel Shaping Technique:
- Old cotton towels or thick fabric (medium to large size works best)
- A round bowl, bucket, or mold to shape over or inside
- Plastic wrap or a plastic bag (to prevent sticking)
- Cooking spray or petroleum jelly (as a release agent)
Painting & Finishing:
- Exterior-grade acrylic paints
- Small detail paintbrushes
- Clear waterproof sealant spray
- Sandpaper (fine grit, for smoothing)
Planting:
- Well-draining potting soil
- Your favorite flowers, succulents, or herbs
- Pebbles or gravel (for drainage layer)
Step-by-Step: How to Make Cement Flower Pots with a Towel
1: Prepare Your Workspace
Safety first! Set up your workspace in a well-ventilated area, ideally outdoors or in a garage. Lay down a plastic sheet or old newspapers to protect surfaces. Put on your rubber gloves and protective eyewear before handling cement — it’s caustic and can irritate skin and eyes with prolonged contact.
Pro tip: Wear old clothes you don’t mind getting dirty. Cement splashes happen to everyone!
2: Mix the Cement
Pour your Portland cement into the mixing bucket. A good starting ratio for the cement towel technique is:
- 2 parts cement to 1 part water
Mix slowly at first, then increase your speed until you achieve a thick, pancake batter-like consistency. The mixture should be thick enough to cling to fabric without dripping excessively. If your mixture is too thin, add a little more cement. Too thick? Add water gradually.
For added texture and durability, you can incorporate one part sand into your mixture — this creates a beautiful, slightly coarser surface that enhances the handmade aesthetic of your DIY garden pots.
3: Soak the Towel in Cement
This is where the magic happens. Fully submerge your old towel into the cement mixture, pressing it down and working the cement thoroughly into every fiber of the fabric. You want complete saturation — every thread should be coated.
Once saturated, carefully lift the towel out of the bucket, allowing excess cement to drip back in. The towel should feel heavy and stiff, but still pliable enough to shape.
4: Shape Your Flower Pot
Here’s where your creativity gets to shine. There are two primary approaches to shaping cement flower pots:
Over-Mold Method (for open bowl shapes):
- Turn your chosen mold (a round bowl or bucket) upside down.
- Cover it with plastic wrap and apply cooking spray.
- Drape the cement-soaked towel over the mold, arranging the folds and drapes to create your desired shape.
- Fold excess fabric under the base to create a flat, stable bottom.
Inside-Mold Method (for deeper pot shapes):
- Line the inside of your mold with plastic wrap.
- Press the cement-soaked towel firmly into the mold, shaping it against the interior walls.
- Smooth the rim and create a flat base.
Whichever method you choose, you can create beautiful organic folds, ruffles, and textures by arranging the fabric intentionally. These natural cement textures are what make each pot truly one of a kind.
5: Allow to Cure Completely
Patience is the most important ingredient in this step. Cover your shaped pot loosely with plastic wrap to slow the curing process — slower curing actually results in stronger cement. Allow the pot to cure for a minimum of 24 to 48 hours, though leaving it for a full 72 hours is ideal for maximum strength.
Keep the pot in a shaded area during curing, as direct sunlight can cause the cement to dry too quickly, leading to cracks.
Once cured, carefully remove the mold and peel away the plastic wrap. Your raw cement flower pot should hold its shape perfectly. If any rough edges bother you, lightly sand them with fine-grit sandpaper.
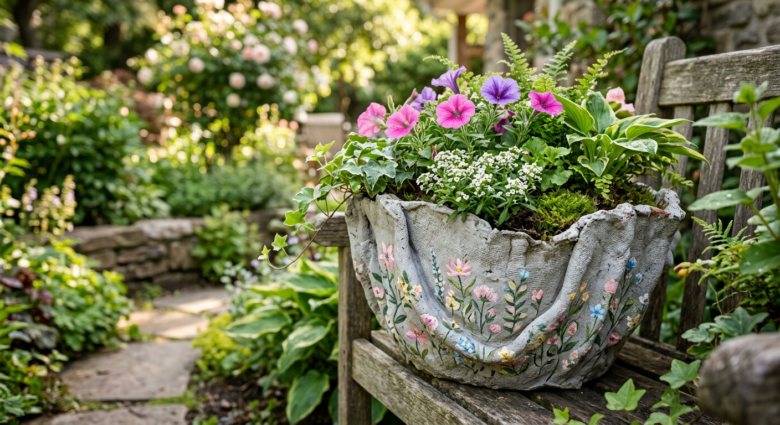
6: Hand-Paint Beautiful Floral Designs
This is the step that transforms a cool craft project into genuine garden art. Using exterior-grade acrylic paints and fine detail brushes, you can paint virtually any design you can imagine onto your cement pot.
Popular design ideas for painted cement flower pots include:
- Delicate cherry blossom branches
- Bold sunflower patterns
- Trailing ivy and leaf motifs
- Watercolor-style abstract florals
- Geometric patterns with botanical accents
- Whimsical birds and butterflies
Tips for painting cement pots:
- Start with a white base coat to make colors pop, especially on gray cement.
- Use thin layers and allow each coat to dry fully before adding detail.
- Don’t be afraid of imperfection — slight irregularities actually enhance the handmade charm.
- Seal your finished design with a clear waterproof sealant to protect it from outdoor elements.
7: Plant and Display Your Creation
Your stunning handmade flower pot is almost ready for its garden debut! Before adding soil, place a layer of small pebbles or gravel at the bottom of the pot to ensure proper drainage — this is especially important for cement pots since you’ll need to create drainage holes.
Creating drainage holes: Before completely curing, you can press a wooden dowel or pencil through the base to create holes. Alternatively, carefully drill holes through the cured cement using a masonry drill bit.
Fill with well-draining potting mix and plant your chosen flowers, succulents, or herbs. Best plants and succulents for container gardening look especially gorgeous in textured cement pots.
Creative Ideas to Take Your Cement Pots to the Next Level
Once you’ve mastered the basic technique, the creative possibilities are endless:
- Layer colors: Apply a base coat of one color, then dry-brush a lighter or contrasting shade over the raised texture for a stunning depth effect.
- Add mosaic accents: Press small glass tiles, broken pottery pieces, or decorative stones into the cement before it fully cures.
- Create matching sets: Make pots in different sizes for a beautifully coordinated garden display.
- Try different fabrics: Burlap, lace, and knitted fabric all create completely different textures and visual effects.
- Make seasonal designs: Paint holiday themes, seasonal flowers, or nature scenes to refresh your garden décor throughout the year.
Troubleshooting Common Cement Pot Problems
Even experienced DIYers run into occasional hiccups. Here’s how to handle the most common issues:
| Problem | Solution |
|---|---|
| Pot cracked during curing | Cure more slowly; keep covered and moist |
| Surface too rough | Sand with fine-grit sandpaper when fully cured |
| Paint peeling | Always seal with exterior-grade waterproof sealant |
| Pot feels fragile | Ensure cement mixture wasn’t too thin |
| Mold stuck to pot | Always use generous amounts of release agent |
Why Handmade Cement Pots Are Better Than Store-Bought
Beyond the sheer joy of creating something with your own hands, DIY cement flower pots offer tangible advantages over mass-produced alternatives:
- Durability: Cement pots are extremely weather-resistant, lasting for years outdoors.
- Customization: Size, shape, color, and design are entirely up to you.
- Cost savings: A single store-bought artisan pot can cost $50–$150. Your homemade version costs a fraction of that.
- Sustainability: Repurposing old towels reduces textile waste.
- Personal pride: There’s nothing quite like showing off garden art you created yourself.
Start Your DIY Cement Flower Pot Journey Today
The cement-and-towel flower pot technique is one of those rare DIY projects that deliver professional-looking results without requiring professional skills or a professional budget. From the meditative process of mixing and shaping to the joyful reveal of a painted, planted finished pot — every step of this creative journey is deeply rewarding.
Whether you’re transforming a tired garden corner, hunting for a unique handmade gift, or simply looking for a relaxing creative outlet, this project delivers on every level.
Ready to get started? Gather your materials, clear your workspace, and dive in. Share your finished DIY cement flower pots in the comments below — we’d love to see your creations! And if you found this guide helpful, save it to your Pinterest boards and share it with a fellow garden lover who deserves to discover this incredible technique.
Your dream garden starts with your own two hands — and one old towel. Happy crafting!