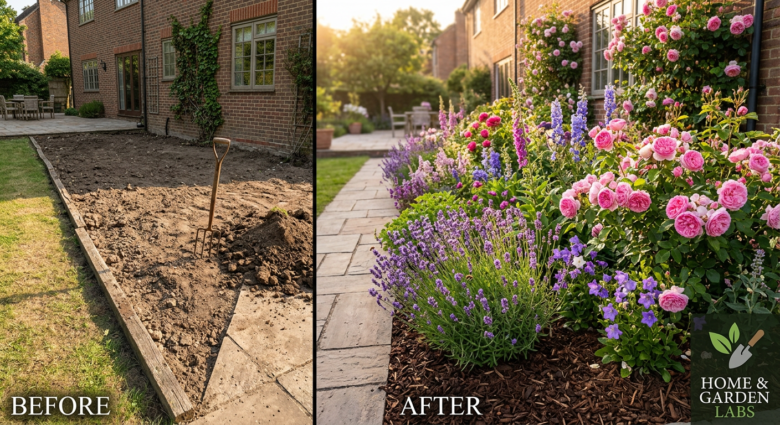
There is something genuinely heartbreaking about a bare, neglected flower bed. You walk past it every single day, knowing deep down that it could be something truly spectacular — a vibrant, colourful display that stops visitors in their tracks and makes your home the envy of the entire street.
The good news? Transforming a bare flower bed into something absolutely stunning does not require years of gardening experience, a professional landscaper, or an enormous budget. With the right plants, a handful of simple tools, and a clear five-step process, you can completely revolutionise your outdoor space in less time than you might imagine.
In this comprehensive guide, we will walk you through everything you need to know about creating a beautiful flower bed transformation — from preparing your soil correctly to choosing the perfect plant layout and adding those all-important finishing touches that make all the difference. Whether you are a first-time gardener or simply looking to refresh a tired-looking border, this article has everything you need to achieve truly incredible results.
Check Out our Guide on Youtube!
What You Will Need Before You Start Your Flower Bed Transformation
Before you get your hands dirty, gathering the right tools and materials is absolutely essential. Attempting a flower bed makeover without the proper supplies is like trying to bake a cake without flour — you simply will not get the results you are hoping for.
Here is everything you will need for a successful flower bed transformation:
- Flowering Plants — Choose a variety of sizes, colours, and bloom times to create visual interest throughout the seasons
- Fresh Compost — High-quality compost feeds the soil and gives your plants the best possible start
- Decorative Bark Mulch — This finishing touch suppresses weeds, retains moisture, and gives your flower bed a polished, professional look
- Watering Can or Garden Hose — Proper hydration immediately after planting is critical for plant survival
- Garden Trowel — For digging planting holes and working compost into the soil
- Garden Gloves — Protect your hands throughout the process
- Kneeling Pad — Optional but highly recommended for comfort during extended planting sessions
Investing in quality materials from the outset will make a significant difference to the long-term success of your flower bed. Cheap compost and poor-quality plants will always underperform, so it genuinely pays to spend a little more where it counts most.
1: Prepare and Feed the Soil — The Foundation of Every Beautiful Flower Bed
The single most important factor determining whether your flower bed transformation succeeds or fails is the quality of your soil preparation. Many gardeners rush this crucial step, eager to get their plants in the ground, and then wonder why their beautiful new display looks lacklustre just weeks later.
Why Soil Preparation Matters So Much
Healthy, well-nourished soil is quite literally the foundation upon which everything else is built. Plants growing in poor, compacted, or nutrient-depleted soil will always struggle — no matter how expensive or beautiful they looked in the garden centre.
Here is how to prepare your flower bed soil correctly:
- Clear the existing bed thoroughly — Remove all weeds, including their roots, dead plant material, and any large stones or debris. A clean slate is essential before you begin.
- Break up compacted soil — Use a garden fork to loosen the soil to a depth of approximately 30cm (12 inches). This improves drainage and allows plant roots to penetrate deeply and establish quickly.
- Add generous amounts of fresh compost — Work a thick layer of quality compost into the top 15-20cm of soil. This improves soil structure, adds vital nutrients, and encourages beneficial microbial activity.
- Level the surface — Once your compost is incorporated, rake the bed level, creating a smooth, even planting surface.
Taking the time to prepare your soil properly is the single greatest investment you can make in your flower bed transformation. Every minute spent here pays dividends for months and years to come.
2: Plan Your Plant Layout — Design Before You Dig
One of the most common mistakes people make when planting a flower bed is simply digging holes and popping plants in wherever they happen to be standing. The result is almost always disappointing — a chaotic, unbalanced display that never quite achieves its full potential.
The Art of Thoughtful Plant Placement
Professional garden designers always plan their plant layouts before a single hole is dug, and you should do exactly the same. Spending just ten to fifteen minutes on planning can make an enormous difference to the finished result.
Consider these key design principles:
- Height and structure — Always plan for taller plants at the back of the border, medium-height plants in the middle, and low-growing or trailing varieties at the front. This creates beautiful layering and ensures every plant can be seen and appreciated.
- Colour harmony — Think carefully about how your chosen colours will work together. Complementary colour schemes (such as purple and yellow, or pink and white) tend to create visually striking displays, while analogous colour schemes (such as oranges, yellows, and reds) create a warm, cohesive feel.
- Spacing — Always check the recommended spacing for each plant variety. Overcrowding is a common mistake that leads to poor airflow, disease problems, and plants competing aggressively for nutrients.
- Season of interest — Choose a mix of plants that bloom at different times of year, ensuring your flower bed delivers colour and interest from spring right through to autumn.
Pro tip: Before digging any planting holes, arrange your plants in their pots on top of the soil in your chosen positions. Step back and assess the overall effect before committing. It is far easier to rearrange pots than to transplant growing plants!
3: Plant Back to Front — The Professional Approach
Now that your soil is beautifully prepared and your layout is planned and approved, it is time for the most exciting part — actually getting your plants in the ground!
Why the Back-to-Front Planting Method Works
Always begin planting from the back of your flower bed and work towards the front. This professional technique prevents you from accidentally treading on newly planted specimens as you work and ensures you maintain consistent spacing throughout.
Follow these steps for perfect planting every time:
Dig your planting hole — Make each hole approximately twice the width of the plant’s root ball and the same depth. This gives roots plenty of room to spread.
Remove plants carefully from their pots — Squeeze the sides of plastic pots gently to loosen the root ball. Never yank plants out by their stems.
Tease out any circling roots — If the root ball is tightly bound, gently tease the outer roots apart before planting. This encourages them to spread outwards into the surrounding soil rather than continuing to circle.
Position the plant correctly — The top of the root ball should sit level with the surrounding soil surface. Planting too deep can cause stem rot; planting too shallow leaves roots exposed and vulnerable.
Backfill and firm — Replace the excavated soil around the root ball, firming it gently with your hands to eliminate air pockets.
Continue this process systematically from the back of the border to the front, checking spacing as you go.
4: Add Decorative Bark Mulch — The Finishing Touch That Transforms Everything
Once all your plants are safely in the ground, adding a layer of decorative bark mulch is the step that truly elevates a good flower bed into something that looks genuinely professional and polished.
The Multiple Benefits of Bark Mulch
Decorative bark mulch is not merely about aesthetics — although it certainly does dramatically improve the visual appeal of any planting scheme. It also delivers several highly practical benefits:
- Weed suppression — A 5-7cm layer of bark mulch significantly reduces weed germination, saving you considerable time and effort throughout the growing season
- Moisture retention — Mulch acts as a protective barrier, reducing water evaporation from the soil surface and keeping plant roots consistently moist
- Soil temperature regulation — Mulch insulates soil against both heat and cold, protecting root systems from temperature extremes
- Improved soil health — As organic bark mulch gradually breaks down, it adds valuable organic matter to the soil
Application tip: Apply bark mulch to a depth of 5-7cm across the entire flower bed, but always keep mulch away from direct contact with plant stems. A small gap around each stem prevents moisture accumulation and reduces the risk of rot.
5: Water Thoroughly and Reveal Your Stunning Transformation
The final step of your flower bed transformation is both the most practical and the most deeply satisfying — a thorough, generous watering followed by the spectacular reveal of your finished creation.
Why Proper Watering at Planting Time is Critical
Newly planted specimens experience a degree of transplant stress regardless of how carefully they are handled. Generous watering immediately after planting helps to settle the soil around root balls, eliminate remaining air pockets, and give plants the hydration they urgently need to begin establishing themselves in their new home.
Water slowly and deeply rather than quickly and superficially. You want moisture to penetrate right down to root level, not just dampen the surface. In the days and weeks following planting, continue to water regularly — particularly during dry spells — until plants are clearly established and growing strongly.
Maintaining Your Beautiful New Flower Bed
Creating a stunning flower bed transformation is enormously satisfying, but maintaining that beauty throughout the seasons requires some ongoing attention. Here are the key maintenance tasks to keep your display looking its absolute best:
- Regular deadheading — Remove spent flowers promptly to encourage continuous blooming
- Periodic feeding — Apply a balanced granular fertiliser every four to six weeks during the growing season
- Consistent watering — Particularly important during hot, dry periods
- Annual mulch refresh — Top up your bark mulch each spring to maintain weed suppression and retain its attractive appearance
- Seasonal plant replacement — Swap out spent annuals for fresh seasonal colour to keep your display vibrant year-round
Your Flower Bed Transformation Awaits
A bare, uninspiring flower bed is genuinely full of potential — just waiting for someone with vision, enthusiasm, and the right guidance to unlock it. By following these five straightforward steps, carefully preparing your soil, planning your plant layout thoughtfully, planting methodically from back to front, finishing with decorative bark mulch, and watering thoroughly, you can achieve a transformation that will quite literally take your breath away.
The results are not just beautiful — they are long-lasting, low-maintenance, and something you will be immensely proud of every single time you walk past your garden.
Ready to Transform Your Own Flower Bed?
We would absolutely love to see your before and after results! Share your flower bed transformation photos in the comments below, tag us on social media, or drop a question if you need personalised advice about your specific garden situation. Whether you are dealing with a shady corner, poor soil, or a tricky shaped border, we are here to help you create the garden display of your dreams.