Turn one store-bought honeydew melon into dozens of fruit-bearing plants — for free!
Growing honeydew from seeds at home is one of the most rewarding gardening projects you can take on. Whether you have a spacious backyard, a raised garden bed, or even a sunny balcony, you can enjoy the unmatched sweetness of homegrown honeydew melons harvested at peak ripeness. The best part? You don’t need to buy a single seed packet. Every honeydew melon you purchase from the grocery store contains hundreds of viable seeds just waiting to be planted.
In this comprehensive guide, you’ll learn exactly how to grow honeydew from seeds at home — from extracting and preparing seeds to harvesting perfectly ripe melons that taste infinitely better than anything you’ll find in the produce aisle.
Why Grow Honeydew Melons from Seeds at Home?
Before we dig into the how-to, let’s talk about why growing honeydew at home is worth your time and effort.
- Cost savings: A single honeydew melon contains 200–400 seeds. That’s potentially dozens of plants from one piece of fruit you were going to eat anyway.
- Superior flavor: Store-bought melons are picked before they’re fully ripe so they can survive shipping. Homegrown honeydew is harvested at peak sweetness, delivering a flavor profile that’s leagues ahead.
- No harmful chemicals: When you grow your own, you control what goes on (and in) your food. No pesticides, no wax coatings, no mystery fertilizers.
- Continuous harvests: With proper care, your honeydew plants can produce multiple melons per vine throughout the growing season, giving you fresh fruit for weeks on end.
- Educational and therapeutic: Gardening reduces stress, teaches patience, and offers a meaningful activity for the whole family.
1: How to Extract Honeydew Seeds from a Store-Bought Melon
The first step in growing honeydew from seeds is getting those seeds out of the fruit. Here’s how to do it properly:
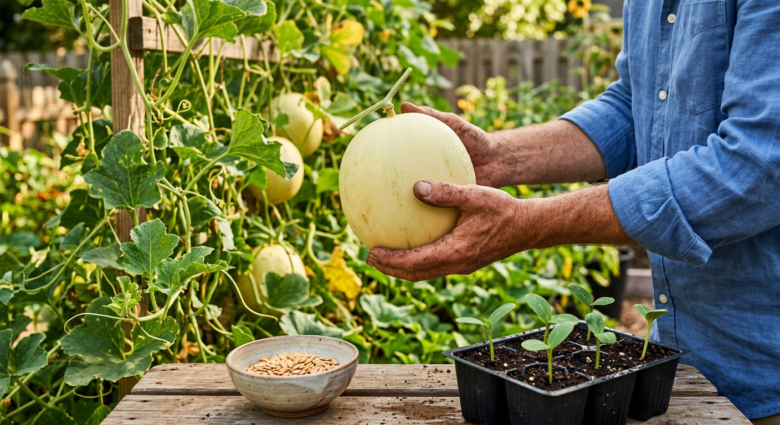
- Choose a ripe honeydew melon. Look for one with a creamy yellow skin (not green), a slightly waxy feel, and a sweet aroma at the blossom end. Ripe melons contain the most mature, viable seeds.
- Cut the melon in half and scoop out the seed cavity with a spoon.
- Separate the seeds from the pulp. Place the seeds in a colander or fine mesh strainer and rinse them under cool running water. Use your fingers to remove any clinging flesh.
- Dry the seeds thoroughly. Spread the clean seeds in a single layer on a paper towel or plate. Allow them to air dry for 5–7 days in a cool, dry location away from direct sunlight.
- Store or plant immediately. Dried seeds can be stored in a paper envelope or airtight container in a cool, dark place for up to 2–3 years. However, for the best germination rates, plant them within the first year.
Pro Tip: Avoid using seeds from hybrid honeydew varieties if you want consistent results. While most store-bought honeydew seeds will germinate, the resulting fruit may vary in quality if the parent plant was a hybrid. For the most reliable outcome, look for organic or heirloom honeydew melons.
2: Germinating Honeydew Seeds Indoors
Honeydew melons are warm-season crops that need soil temperatures of at least 65°F (18°C) to germinate — ideally 70–90°F (21–32°C). Starting seeds indoors gives you a significant head start, especially if you live in a region with a shorter growing season.
What You’ll Need:
- Seed starting trays or small pots (peat pots work great since you can transplant them directly)
- Quality seed starting mix (light, well-draining, and sterile)
- Spray bottle for watering
- Plastic wrap or humidity dome
- A warm location or seedling heat mat
How to Germinate:
- Fill your pots with moistened seed starting mix, leaving about half an inch of space at the top.
- Plant 2–3 seeds per pot, pushing them about ½ to 1 inch deep into the soil.
- Cover lightly with soil and mist with water using a spray bottle.
- Create a mini greenhouse by covering the tray with plastic wrap or a humidity dome to retain moisture and warmth.
- Place in a warm spot. A sunny windowsill, the top of a refrigerator, or a seedling heat mat set to 75–85°F works perfectly.
- Expect germination in 7–14 days. Once sprouts appear, remove the plastic cover and move seedlings to a location with 6–8 hours of direct sunlight or under grow lights.
- Thin to one seedling per pot once they develop their first set of true leaves. Keep the strongest, healthiest-looking sprout and snip the others at the soil line.
3: Transplanting Honeydew Seedlings Outdoors
Timing is everything when transplanting honeydew seedlings outdoors. These tropical plants are extremely sensitive to cold, and even a light frost will kill them.
When to Transplant:
- Wait until 2–3 weeks after your last frost date.
- Soil temperature should be consistently at or above 65°F (18°C).
- Seedlings should have 3–4 true leaves and be about 4–6 inches tall.
How to Transplant:
- Harden off your seedlings by gradually exposing them to outdoor conditions over 7–10 days. Start with a few hours of filtered sunlight and increase exposure daily.
- Choose the right location. Honeydew melons need full sun — a minimum of 8 hours of direct sunlight per day. Select a spot with excellent air circulation and well-draining soil.
- Prepare the soil. Amend your garden bed with compost or aged manure. Honeydew thrives in slightly acidic to neutral soil with a pH between 6.0 and 6.8.
- Create mounds or hills. Plant seedlings in raised mounds about 12 inches wide and 6 inches high. This improves drainage and warms the soil faster. Space mounds 4–6 feet apart to give vines room to sprawl.
- Plant one seedling per mound at the same depth it was growing in its pot.
- Water deeply after transplanting and apply a layer of organic mulch (straw works beautifully) around the base to retain moisture, suppress weeds, and keep the developing fruit clean.
Balcony and Container Growers: Yes, you can grow honeydew in containers! Choose a pot that’s at least 5 gallons (ideally 10–15 gallons), ensure it has drainage holes, and provide a sturdy trellis for the vines to climb. Use a sling made from old t-shirts or mesh bags to support the heavy fruit as it grows.
4: Caring for Your Honeydew Plants
Growing honeydew from seeds successfully requires consistent attention to a few critical care factors.
Watering
- Water deeply and consistently, providing 1–2 inches of water per week.
- Water at the base of the plant, not overhead, to prevent fungal diseases like powdery mildew.
- Reduce watering as melons approach maturity (the last 1–2 weeks before harvest). This concentrates sugars and produces sweeter fruit.
Fertilizing
- Apply a balanced fertilizer (10-10-10) when seedlings are first transplanted.
- Switch to a phosphorus- and potassium-rich fertilizer (such as 5-10-10) once flowers appear. This promotes fruit development over foliage growth.
- Side-dress with compost every 3–4 weeks throughout the growing season.
Pollination
- Honeydew plants produce both male and female flowers on the same vine. Male flowers appear first; female flowers (identifiable by the small swelling at the base) follow a week or two later.
- Attract pollinators by planting companion flowers like marigolds, zinnias, or lavender nearby.
- If pollinators are scarce (common for balcony growers), hand-pollinate by transferring pollen from male flowers to female flowers using a small paintbrush or cotton swab.
Pest and Disease Management
- Common pests: Aphids, cucumber beetles, and squash bugs. Use neem oil spray, insecticidal soap, or introduce beneficial insects like ladybugs.
- Common diseases: Powdery mildew, downy mildew, and fusarium wilt. Ensure proper spacing and air circulation, avoid overhead watering, and rotate crops annually.
5: Harvesting Your Homegrown Honeydew Melons
This is the moment you’ve been waiting for! Honeydew melons typically take 80–100 days from seed to harvest. Knowing when to pick them is crucial — unlike some fruits, honeydew does not continue to ripen significantly after being picked.
Signs Your Honeydew Is Ready to Harvest:
- Color change: The skin transitions from green to creamy white or pale yellow.
- Texture: The skin develops a slightly waxy, velvety feel.
- Blossom end: The end opposite the stem gives slightly when pressed gently.
- Aroma: A sweet, fragrant smell emanates from the blossom end.
- Stem: Unlike cantaloupe, honeydew does NOT slip from the vine. You’ll need to cut it with a sharp knife or pruning shears, leaving about 1 inch of stem attached.
After harvesting, allow your honeydew to sit at room temperature for 2–3 days to soften slightly, then refrigerate. Homegrown honeydew stored properly in the refrigerator will keep for up to two weeks.
Frequently Asked Questions About Growing Honeydew from Seeds
Can I grow honeydew from seeds year-round?
Outdoors, honeydew is a summer crop. However, if you have a heated greenhouse or indoor growing setup with sufficient light, you can extend the season significantly.
How many melons does one honeydew plant produce?
On average, each healthy honeydew vine produces 2–4 melons per season. Pruning secondary vines can direct energy toward fewer, larger, and sweeter fruits.
Is it better to grow honeydew from seeds or transplants?
Starting from seeds is more economical and gives you a wider variety selection. Transplants save time but are often limited to common hybrid varieties.
What’s the best companion plant for honeydew?
Radishes, nasturtiums, corn, sunflowers, and herbs like basil and dill make excellent companions, deterring pests and attracting pollinators.
Start Growing Your Own Honeydew Today!
Growing honeydew from seeds at home is easier than most people think — and the reward of biting into a sun-warmed, perfectly ripe melon you grew yourself is truly incomparable. All it takes is one store-bought fruit, a little patience, and the tips in this guide to get started.
Don’t forget to share this guide with a fellow gardener who’d love to grow their own melons. Happy growing!