Have you ever walked into a beautifully decorated home and wondered how people manage to make their spaces look so polished and expensive? The secret is not always a hefty budget or a professional interior designer. Sometimes, all it takes is a little creativity, a handful of everyday materials, and the willingness to roll up your sleeves and try something new.
Today, we are diving into one of the most satisfying and budget-friendly DIY home decor ideas trending right now — upcycled glass bottle centerpieces. This simple yet stunning project will completely transform the look and feel of any room in your home, and the best part is that it costs almost nothing to create. Whether you are a seasoned DIY enthusiast or a complete beginner, this step-by-step guide will walk you through everything you need to know to create gorgeous, Instagram-worthy home décor that looks like it came straight from a high-end boutique.
Also Check DIY Glass Bottle Decor Ideas
Why DIY Home Decor Is the Smartest Choice Right Now
With the cost of living rising across the board, more and more homeowners and renters are turning to DIY home decor projects as a smart alternative to expensive store-bought pieces. And it makes perfect sense. Not only does a good DIY project save you serious money, but it also gives you the freedom to customize every detail to perfectly match your existing décor and personal style.
Beyond the financial benefits, there is something deeply satisfying about creating something beautiful with your own hands. DIY home decor projects like this one also offer an eco-friendly advantage. Instead of throwing away old glass bottles, you are repurposing them into something genuinely beautiful, reducing waste and making a positive environmental impact at the same time.
This particular project checks every box:
- Budget-friendly — most materials cost under $10 total
- Beginner-friendly — no special skills required
- Quick — completed in 30 minutes or less
- Customizable — endless color and style options
- Eco-conscious — repurposes items you already have at home
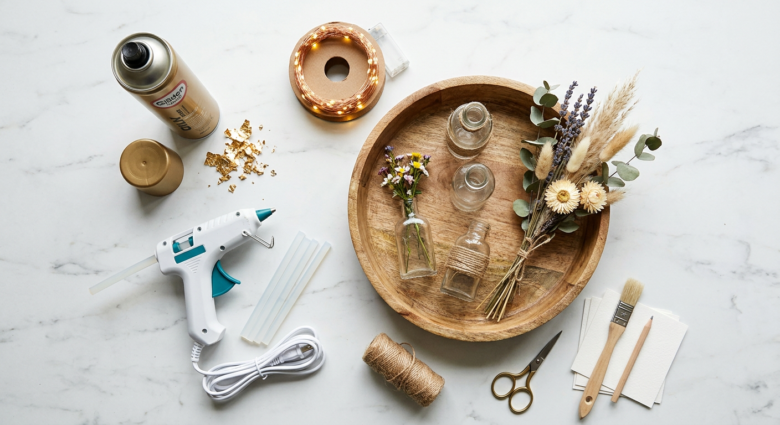
What You Will Need for This DIY Glass Bottle Decor Project
Before we get into the step-by-step process, let us gather all of the materials you will need. The beauty of this project is that most of these items are either already sitting in your home or can be picked up at your local dollar store or craft shop without breaking the bank.
Materials List:
- Old Glass Bottles — wine bottles, olive oil bottles, sauce jars, or any glass containers you have around the house
- Gold or White Spray Paint — these colors give the most luxurious, high-end finish, but feel free to choose any color that suits your style
- Dry Flowers or Artificial Plants — pampas grass, dried lavender, eucalyptus stems, or faux greenery all work beautifully
- Wooden Board or Decorative Tray — this serves as the base of your centerpiece and ties the whole display together
- Hot Glue Gun — for securing elements in place and adding any additional embellishments
- Fairy Lights (Optional) — for adding a warm, magical glow to your display, especially in the evenings
Once you have everything gathered, you are ready to begin. Clear a well-ventilated workspace, lay down some newspaper or a drop cloth to protect your surfaces, and let’s get started.
Step-by-Step Guide: How to Make DIY Glass Bottle Home Decor
1: Prepare Your Glass Bottles
Start by thoroughly cleaning your glass bottles. Remove any labels by soaking the bottles in warm soapy water for about 15 minutes. The labels should peel off easily, and any stubborn adhesive residue can be removed with a little rubbing alcohol or cooking oil. Once clean, dry the bottles completely before moving on to the next step.
Pro Tip: Use bottles of varying heights and shapes to create visual interest and a more dynamic display. A tall wine bottle paired with a medium olive oil bottle and a small sauce jar creates a beautifully layered look.
2: Apply the Spray Paint
Head outside or to a well-ventilated area for this step. Shake your spray paint can well, then hold it approximately 10 to 12 inches away from the bottle. Apply the paint in smooth, even strokes, rotating the bottle as you go to ensure full, even coverage.
Apply two to three light coats rather than one heavy coat. This technique prevents drips and gives you a much smoother, more professional-looking finish. Allow each coat to dry for approximately 10 minutes before applying the next one.
Color Ideas to Consider:
- Gold — adds warmth and a luxurious, glamorous touch
- White or Cream — creates a clean, minimalist, Scandinavian-inspired look
- Matte Black — bold, modern, and incredibly chic
- Sage Green — earthy and on-trend with the biophilic design movement
- Terracotta — perfect for a boho or Mediterranean-inspired aesthetic
3: Arrange Your Bottles on the Tray
Once your bottles are fully dry, it is time to start arranging them on your wooden board or decorative tray. Play around with different arrangements before committing to one. Generally, placing the tallest bottle toward the back and progressively shorter bottles toward the front creates a pleasing, layered composition.
If you want to secure your bottles to the tray for added stability, a small dab of hot glue on the base of each bottle will do the trick perfectly.
4: Add Your Flowers and Greenery
This is where the magic really happens. Begin inserting your dried flowers or artificial stems into the bottles. Pampas grass and dried pampas plumes are incredibly popular right now and look absolutely stunning when paired with gold or white painted bottles. Dried lavender adds both beauty and a subtle, calming fragrance. Eucalyptus stems, whether real or artificial, bring a fresh, organic feel to the arrangement.
Mix and match different textures and heights for the most visually appealing result. Do not be afraid to let some stems spill gracefully over the sides of the bottles for a natural, effortless look.
Styling Tips:
- Odd numbers of bottles tend to look more natural and visually balanced than even numbers
- Mix textures — combine fluffy pampas grass with delicate dried flowers and structured greenery
- Let stems vary in height to create depth and dimension within your arrangement
5: Add the Finishing Touches
Now it is time to elevate your centerpiece from beautiful to truly breathtaking. Consider adding a few additional decorative elements around the base of your bottles on the tray. Small decorative stones, candles, pinecones, or even a few scattered dried flower petals can all add wonderful texture and visual interest.
If you opted to include fairy lights, now is the time to weave them gently around and between the bottles. When lit, they cast a warm, golden glow that makes the entire display look absolutely magical — perfect for cozy evenings at home or for entertaining guests.
Use your hot glue gun to add any additional embellishments like twine, ribbon, or small decorative charms to the necks of your bottles for a personalized, handcrafted touch.
Creative Ways to Display Your DIY Glass Bottle Decor
One of the things that makes this project so incredibly versatile is that it works beautifully in virtually every room of the home. Here are some of our favorite ways to display your finished creation:
- As a dining table centerpiece — place it in the center of your dining table for an elegant focal point during meals and gatherings
- On a fireplace mantel — flanked by candles and other decorative objects for a styled, magazine-worthy mantel display
- On a bathroom vanity — a smaller-scale version adds a spa-like, luxurious feel to any bathroom
- On a bedroom dresser — creates a romantic, serene atmosphere in your personal space
- On open kitchen shelving — adds warmth and personality to functional kitchen spaces
- As a window display — when backlit by natural light, the bottles create a stunning silhouette effect
How to Customize This Project to Match Your Home’s Style
The true genius of this DIY home decor idea lies in its incredible versatility. By simply changing the colors and the types of botanicals you use, you can adapt this project to suit virtually any interior design style:
- Modern Minimalist: White or matte black bottles with a single stem of sculptural dried grass on a sleek white tray
- Bohemian: Terracotta and earthy-toned bottles with abundant pampas grass, dried wildflowers, and macramé accents
- Farmhouse Chic: Cream or distressed white bottles with dried lavender and cotton stems on a rustic wooden board
- Glamorous: Gold bottles with tall feathery pampas and fairy lights on a mirrored tray
- Scandinavian: Pale grey or white bottles with simple greenery and clean lines on a light natural wood board
Tips for Making Your DIY Project Last Longer
To ensure your beautiful new centerpiece stays looking its best for as long as possible, keep these simple care tips in mind:
- Keep your display away from direct sunlight, which can fade both the paint and the dried flowers over time
- Dust gently with a soft brush or hair dryer on a cool setting to remove dust without damaging delicate botanicals
- Refresh dried flowers seasonally to keep the display looking fresh and current
- Store in a cool, dry place if you decide to change up your décor with the seasons
Your Home Deserves a Beautiful Transformation
Creating a stunning home does not have to mean spending thousands of dollars on furniture and décor. With a little creativity and just 30 minutes of your time, you can craft beautiful, one-of-a-kind pieces that add genuine personality, warmth, and style to your living space — all while keeping your budget completely intact.
This DIY glass bottle decor project is the perfect starting point for anyone looking to explore the world of budget-friendly home decorating. It is quick, it is easy, it is incredibly rewarding, and the results are genuinely impressive.
Ready to Start Your DIY Transformation?
We would love to see what you create! Try this project this weekend and share your finished centerpiece in the comments below. Tell us which color combination you chose and where you decided to display your creation. Your ideas might just inspire someone else to transform their home too.
If you found this guide helpful, be sure to bookmark this page, share it with a friend who loves home decor, and subscribe to our newsletter for more budget-friendly DIY home decor ideas delivered straight to your inbox every week. Your dream home is closer — and more affordable — than you think.