Have you ever bought a bunch of fresh mint from the grocery store, used a few sprigs, and watched the rest wilt away in your fridge? Or maybe you’ve dreamed of having a lush herb garden but assumed it required special seeds, expensive soil, or a green thumb you don’t quite have yet?
Here’s the good news: growing mint at home is shockingly simple, and you don’t need any of those things. All it takes is one fresh mint stem, a glass of water, and a sunny windowsill — and within just 7 days, you’ll have a thriving, rooted plant ready to grow forever.
This step-by-step guide will walk you through exactly how to grow mint from a cutting using the water propagation method — one of the most beginner-friendly gardening techniques available. Whether you’re a first-time gardener or simply looking for a free, sustainable way to keep fresh herbs on hand, this method works every single time.
Do check our Guide on Youtube. Let’s get growing.
Why Grow Mint from a Stem Cutting?
Before we dive into the steps, let’s talk about why this method beats buying seeds or potted plants from a nursery.
- It’s completely free. You can use a stem from your own garden, a neighbor’s plant, or even a bunch from the grocery store.
- It’s faster than seeds. Mint seeds can take weeks to germinate. A stem cutting can produce visible roots in as little as 3 to 7 days.
- It’s infinitely repeatable. Every time you harvest mint, you create new cuttings — which means you can propagate new plants forever.
- It’s virtually foolproof. Mint is one of the most vigorous, fast-growing herbs on the planet. It wants to survive, and it’s incredibly forgiving for beginners.
The propagation method described in this guide — also known as water rooting or stem propagation — is used by gardeners around the world to multiply their herb gardens without spending a single cent.
What You’ll Need to Grow Mint from a Cutting
One of the most beautiful things about this method is how minimal the supply list is. Here’s everything you need:
- 1 fresh mint stem (from your garden, a friend’s plant, or the grocery store)
- A clean glass, jar, or cup
- Fresh, room-temperature water
- A bright windowsill with indirect sunlight
That’s genuinely it. No grow lights, no fertilizer, no special soil mix, no expensive equipment. Just a cutting and some water.
How to Choose the Perfect Mint Stem for Propagation
Not every mint stem will root equally well, so it’s worth spending a moment selecting the right one. Here’s what to look for:
Choose a Healthy, Non-Flowering Stem
Look for a stem that is green, firm, and free from yellowing or wilting leaves. Avoid stems that are already flowering — once mint puts energy into flowering, it’s less focused on root production. Young, actively growing stems tend to root the fastest.
Aim for a Stem That’s 4 to 6 Inches Long
This gives you enough length to submerge the lower portion in water while keeping the upper leaves above the waterline. A stem that’s too short may not have enough nodes to produce strong roots.
Check for Leaf Nodes
Leaf nodes are the small bumps or joints where leaves grow out from the stem. These are the exact points from which roots will sprout — so make sure your cutting has at least two to three visible nodes.
Step-by-Step: How to Grow Mint in Water
1: Cut the Stem the Right Way
Using clean scissors or a sharp knife, cut your mint stem just below a leaf node — about a quarter inch beneath one. This positioning is critical because the node contains the cells responsible for generating new roots.
Once you’ve made your cut, remove the leaves from the bottom half of the stem. You want to leave only the top two to three sets of leaves intact. Submerged leaves will rot in water, encouraging bacteria growth and potentially killing your cutting before roots ever form.
Pro tip: If you’re using mint from the grocery store, look for stems that are still somewhat firm and not completely wilted. Even slightly tired-looking grocery store mint can be successfully propagated — just trim the ends fresh before placing them in water.
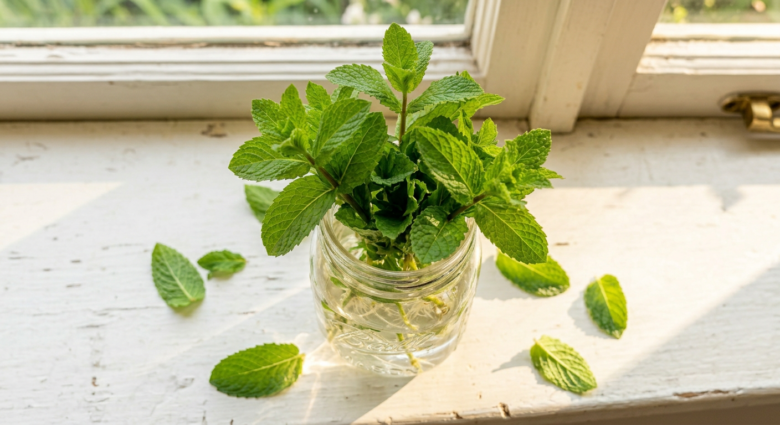
2: Set Up Your Water Propagation Station
Fill a clean glass or jar with fresh, room-temperature water. Avoid using water that’s too cold, as this can shock the cutting and slow root development.
Place your mint stem into the glass so that:
- At least one or two leaf nodes are submerged beneath the waterline
- The remaining leaves sit comfortably above the water without touching the surface
Place your glass on a bright windowsill that receives plenty of indirect light throughout the day. East or west-facing windows tend to work beautifully. Avoid placing your cutting in harsh, direct afternoon sunlight — too much intense light can cause the cutting to dry out or overheat before it has a chance to root.
Change the water every two days to keep it fresh and prevent the buildup of bacteria and algae. Each time you refresh the water, give the glass a quick rinse as well.
3: Watch the Day-by-Day Progress
Here’s the magical part — and one of the most satisfying experiences in home gardening:
- Days 1–2: Your cutting settles into the water. You may notice the leaves looking slightly perkier as the stem begins to hydrate. No visible roots yet, but the process has begun.
- Days 3–4: Tiny white root nubs begin to appear at the leaf nodes beneath the waterline. This is your first sign of success — celebrate it!
- Days 5–6: Roots become more defined and begin to elongate. You may see several roots emerging from a single node.
- Day 7: With the right conditions, your roots can reach half an inch to an inch in length. Your cutting is officially becoming a plant!
Results can vary slightly depending on the temperature in your home, the quality of light, and the health of your original cutting — but most mint stems root reliably within this 7-day window.
Bonus Step: Potting Your Rooted Mint into Soil
Once your roots reach 1 to 2 inches in length, your mint cutting is ready to be transferred into soil. Here’s how to make the transition smoothly:
- Choose a pot with drainage holes. Mint loves moisture but hates sitting in waterlogged soil.
- Use a well-draining potting mix. A standard herb or vegetable potting mix works perfectly. You can also mix in a little perlite for extra drainage.
- Make a small hole in the soil and gently place your rooted cutting inside, taking care not to damage the delicate new roots.
- Water thoroughly after planting and place the pot back in a bright, indirect light location.
- Ease it into direct sunlight gradually over the first week, allowing the plant to adjust.
Within two to three weeks of being potted, your mint will take off with vigorous new growth, and you’ll be harvesting fresh leaves before you know it.
How to Grow Unlimited Mint — Forever
Here’s where the real magic lies. Every time you harvest or trim your mint plant, you’re creating new cuttings. Simply take those trimmed stems, strip the lower leaves, pop them into a fresh glass of water, and start the process all over again.
One plant becomes two. Two become four. Four become eight. Before long, you’ll have more fresh mint than you know what to do with — and you’ll never need to buy it again.
Ideas for using your fresh mint harvest:
- Mint tea and infused water
- Mojitos and summer cocktails
- Fresh salads and grain bowls
- Homemade desserts and chocolate bark
- DIY skincare and beauty recipes
- Natural pest deterrent in your garden
Common Mistakes to Avoid When Growing Mint from Cuttings
Even with the simplest methods, a few common pitfalls can slow your success. Watch out for these:
- Leaving leaves submerged in water — always strip the bottom half of your stem clean
- Forgetting to change the water — stale water breeds bacteria; refresh every two days
- Placing cuttings in harsh direct sunlight — indirect bright light is the sweet spot
- Transplanting too early — wait until roots are at least 1 inch long before moving to soil
- Using a dirty glass — always start with a clean container to prevent contamination
Your Free Mint Garden Starts Today
Growing mint from a single stem is one of those rare gardening wins that genuinely feels like a superpower once you try it. It costs nothing, takes minutes to set up, and delivers visible results in just one week. Whether you’re starting from a cutting in your backyard or a sprig from last night’s grocery run, the process is exactly the same — and the results are always rewarding.
So here’s your challenge: Grab one mint stem today, fill a glass with water, and set it on your brightest windowsill. Check back in seven days and prepare to be amazed.