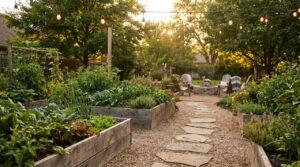
Have you ever looked at your backyard or garden and felt like something was missing? Maybe it looks plain. Maybe it feels boring. You want something beautiful, but you don’t know where to start.
Here’s the good news. You don’t need a huge budget. You don’t need professional training. All you need is some soil, decorative stones, colorful flowers, and a clear plan.
This guide walks you through creating a stunning moon and star garden design, step by step. By the end, your empty space will look like something out of a fairy tale.
Why a Moon and Star Garden Design Works So Well
Celestial garden designs are trending right now. And there’s a good reason for that.
The moon and star shapes are easy to recognize. They look magical. They also photograph beautifully, which makes them perfect for sharing online.
But beyond looks, this design has real practical benefits:
- It organizes your garden space. The shapes create clear zones for different plants.
- It works in small spaces. You can make a tiny moon design in a corner or go big across your whole yard.
- It looks impressive but isn’t too hard. With the right steps, anyone can do this.
- It works in all seasons. You can swap flowers out as seasons change, and the stone outline stays in place.
This design is not just pretty. It’s smart garden planning.
What You Need Before You Start
Getting your supplies ready saves you time and stress. Here’s a simple list.
Shaping the design:
- Garden soil or topsoil
- A long stick or garden hose (for drawing your moon and star shapes)
- A shovel or trowel
- A rake
The outline and texture:
- Decorative stones (white, gray, or cream tones work best)
- Small river rocks
- Sand (optional, for a cleaner look between stones)
For color and life:
- Colorful flowers like marigolds, petunias, lavender, or pansies
- Low-growing ground cover plants
- Mulch to help hold moisture
Optional extras:
- Solar garden lights shaped like stars or moons
- Garden edging strips to keep the shape clean
- A measuring tape for precision
You don’t need all of these at once. Start simple. Add more as you go.
1: Choose the Right Spot in Your Garden
Location matters more than most people think. Before you touch the soil, walk around your garden and look for the best spot.
Ask yourself these questions:
- Is this area visible from inside the house or from the main entrance?
- Does it get enough sunlight for flowers to grow?
- Is the ground fairly flat?
- Is it easy to water this spot?
The best spot is one you’ll actually see and enjoy every day. There’s no point putting all this work into a corner no one walks past.
Once you pick your spot, mark it out with string or a garden hose. This gives you a rough boundary to work inside.
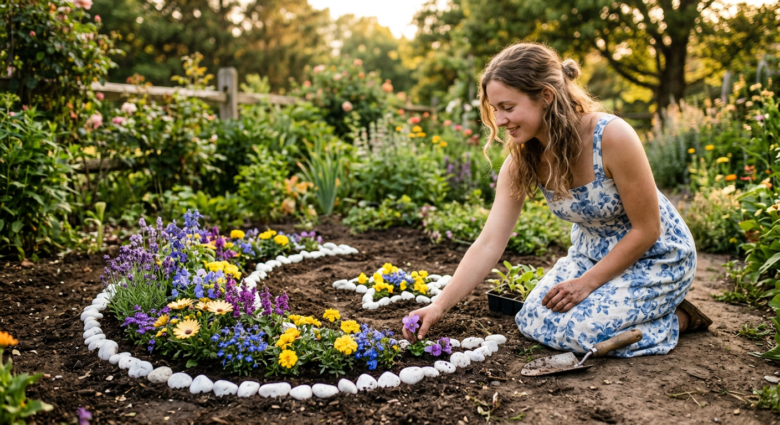
2: Shape the Moon Design in the Soil
This is where the magic starts. Take your stick or a pointed tool and draw a large crescent moon shape in the soil.
Here’s a simple way to do it:
- Draw a large circle first.
- Then draw a slightly smaller circle overlapping it from one side.
- The area between these two circles, on one side, is your crescent moon shape.
Now remove the soil from outside your moon shape to define the edges. Mound the soil slightly inside the moon shape. This raised effect catches light and shadows beautifully and makes the design pop from any angle.
Don’t worry about making it perfect. A slightly imperfect moon looks natural and organic. That’s part of its charm.
3: Add the Star Shapes Around the Moon
Stars make the moon design come alive. You don’t need many. Three to five stars of different sizes look great.
How to draw a simple star in soil:
- Draw a circle in the soil where you want your star.
- Make five small marks evenly around the circle.
- Connect opposite marks with lines to form a five-pointed star shape.
- Gently press down or scoop soil along the star outline.
Place your stars at different distances from the moon. Scatter them naturally. Some can be close, some farther away. Vary the sizes too. Mix a big star with a couple of tiny ones.
This creates a sense of depth and movement, like a real night sky frozen in your garden.
4: Place Your Decorative Stones
Stones do two jobs. First, they outline the shapes clearly. Second, they add texture and contrast to the flowers.
Start by lining the edges of your moon shape with your decorative stones. Press them gently into the soil so they stay in place.
Tips for placing stones:
- Use larger stones on the outer edge of the moon for a bold outline.
- Use smaller stones inside the star shapes for detail.
- Mix stone colors if you want a more textured look.
- Keep stone colors consistent if you want a cleaner, more elegant design.
White or cream stones work especially well for a moonlight effect. When the sun hits them, they almost seem to glow.
Fill any gaps between stones with sand or fine gravel. This keeps weeds from pushing through and keeps the lines crisp.
5: Choose and Arrange Your Flowers
This step is where your garden truly comes to life. Color choice matters a lot here.
For a magical, celestial feel, think about colors that match the night sky theme:
- Purple and violet flowers like lavender or salvia
- White and cream flowers like white petunias or daisies
- Deep blue flowers like lobelia or blue salvia
- Yellow and gold flowers like marigolds or black eyed Susans (these look like stars!)
- Pink flowers like phlox for a soft, dreamy touch
How to arrange flowers inside the moon shape:
Place taller flowers toward the center of the moon. Put shorter flowers and ground cover near the edges. This creates a natural, full look.
How to arrange flowers around the stars:
Plant small clusters of bright flowers around each star shape. Let flowers frame the stones rather than hiding them.
Step back often. Look at the whole design from a distance. Adjust as needed. Fresh eyes help you see what looks balanced and what needs more color.
6: Add Mulch and Water Well
Once your flowers are planted, spread a thin layer of mulch over the soil between plants. This helps hold moisture in the soil. It also stops weeds from growing up through your beautiful design.
Water your new garden well after planting. Flowers go through stress when they’re moved to a new spot. A good deep watering helps them settle in fast.
After that first big watering, follow a regular watering schedule. Most garden flowers need water every two to three days in warm weather.
3 Ways to Make Your Moon Garden Stand Out Even More
You’ve built something beautiful. Now let’s take it to the next level.
1. Add solar lights
Solar stake lights shaped like stars or moons are affordable and easy to find. Push them into the soil around your design. At night, they create a soft glowing effect that makes the whole garden look enchanting.
2. Use colored stones or glass gems
Clear or colored glass stones catch sunlight and add a sparkly effect during the day. Mix them with your regular stones for bursts of light and color.
3. Add seasonal plants
Your stone outline stays all year. But you can swap flowers with the seasons. Use bright summer blooms in summer. Switch to fall flowers like mums in autumn. This keeps your garden looking fresh and alive all year long.
How to Keep Your Magical Garden Looking Great All Season
A beautiful garden takes some upkeep. But it doesn’t have to be hard.
- Deadhead your flowers regularly. Remove old, spent blooms so the plant puts energy into making new ones.
- Check your stones. After rain or wind, stones may shift. Nudge them back into place.
- Pull weeds early. Small weeds are easy to pull. Big ones are a fight. Get them early.
- Fertilize once a month. A simple liquid fertilizer keeps flowers blooming strong.
- Refresh your mulch. Add a fresh layer of mulch mid season to keep moisture in and weeds out.
Spending 15 to 20 minutes a week on basic maintenance keeps your moon garden looking like the day you first finished it.
Why This Garden Project Is Worth Your Time
Some people think garden projects are too hard or too expensive. But this one is different.
You can build a simple version in a single afternoon. The materials cost less than a night out at a restaurant. And the results last for months, even years, with basic care.
You also get something money can’t easily buy. Every time you look out your window, you’ll see something beautiful that you made with your own hands. That feeling is hard to put a price on.
And if you record the process like the video that inspired this guide, you’ll have something amazing to share. People love watching garden transformations. They’re relaxing, inspiring, and genuinely satisfying to watch.
Start Your Moon and Star Garden This Weekend
You now have everything you need to know. The steps are clear. The materials are simple. The results are stunning.
Pick your spot. Gather your stones and flowers. Shape that moon in the soil. And watch an empty space become something magical.
Take a photo when you finish and share it with your friends. Better yet, film the whole process. You might be surprised how many people want to see your transformation from start to finish.
Your garden is waiting. Go make something beautiful.